
In today's fast-paced business landscape, staying ahead of the competition requires efficient and effective solutions. According to Microsoft’s Work Trend Index, nearly 70% of employee report that they don’t have sufficient time in the day to focus on “work”, with more time being spent Communicating than Creating.
Microsoft 365 Copilot is designed, with Microsoft’s cloud trust platform at its core, to allow for employees to both be more productive, reduce the time spent searching for information, performing mundane tasks, and other low-value activities.
This month we are looking at Microsoft Defender Vulnerability Management (MDVM). In this post, you will learn how MDVE can identify vulnerabilities and remediate weaknesses in your organization.
Born within Microsoft Defender for Endpoint (MDE) Plan 2, MDVE focuses more on mitigations for standing endpoint vulnerabilities to reduce the attack surface. There are many vantage points from which to view organization exposure, so look below to see how MDVE can raise eyebrows and create a weakness remediation roadmap for any organization.
Index: Licensing Requirements | Security Portal | Vulnerabilities | Notifications | Workshop
First, let’s look at Microsoft’s licensing requirements for the product. MDVM is partially available within Microsoft Defender for Endpoint P2 with an optional add-on allowing full capabilities. If your organization is not leveraging MDE, there is a standalone option as well. This post will focus on the core capabilities and a Part 2 will encompass the additional capabilities in the middle column below.
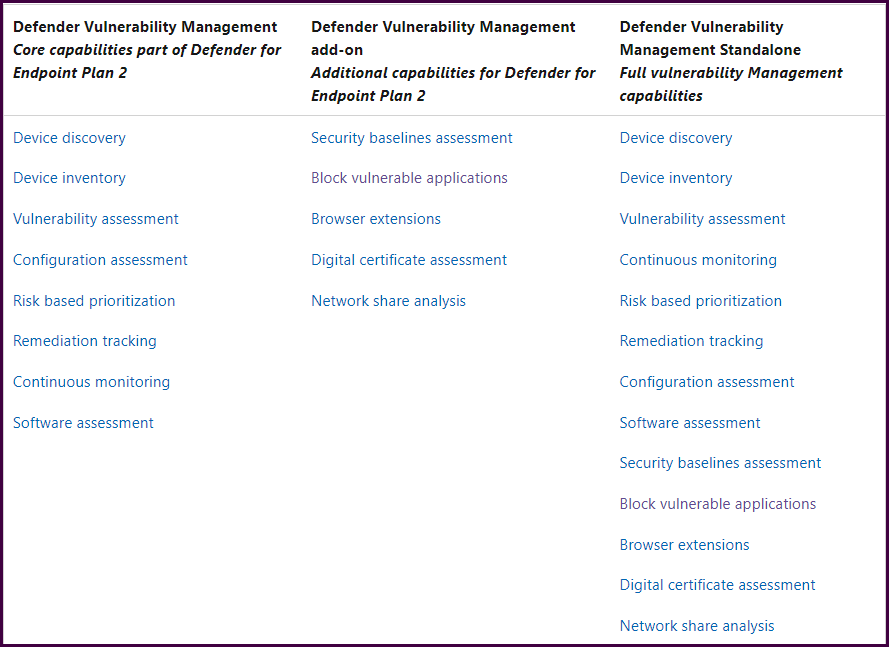
Compare Microsoft Defender Vulnerability Management offerings | Microsoft Docs
Regardless of your current licensing, everyone can get their hands on a 120-day trial to evaluate the full product. Or, if you are using MDE Plan 2 and want to get started with the core capabilities before limiting yourself to 120 days with an Add-on trial, skip this part and return when you are ready to expand MDVM’s capabilities. This post will focus on core capabilities
- If you don't have Defender for Endpoint Plan 1 or Plan 2, or Microsoft 365 E3, sign up to try the Defender Vulnerability Management Standalone trial.
- If you already have Defender for Endpoint Plan 2, sign up to try the Defender Vulnerability Management Add-on trial.
Next, let’s look at the security portal. We’ll start with the dashboard to get a high-level overview of the environment alongside top vulnerabilities and recommendations.
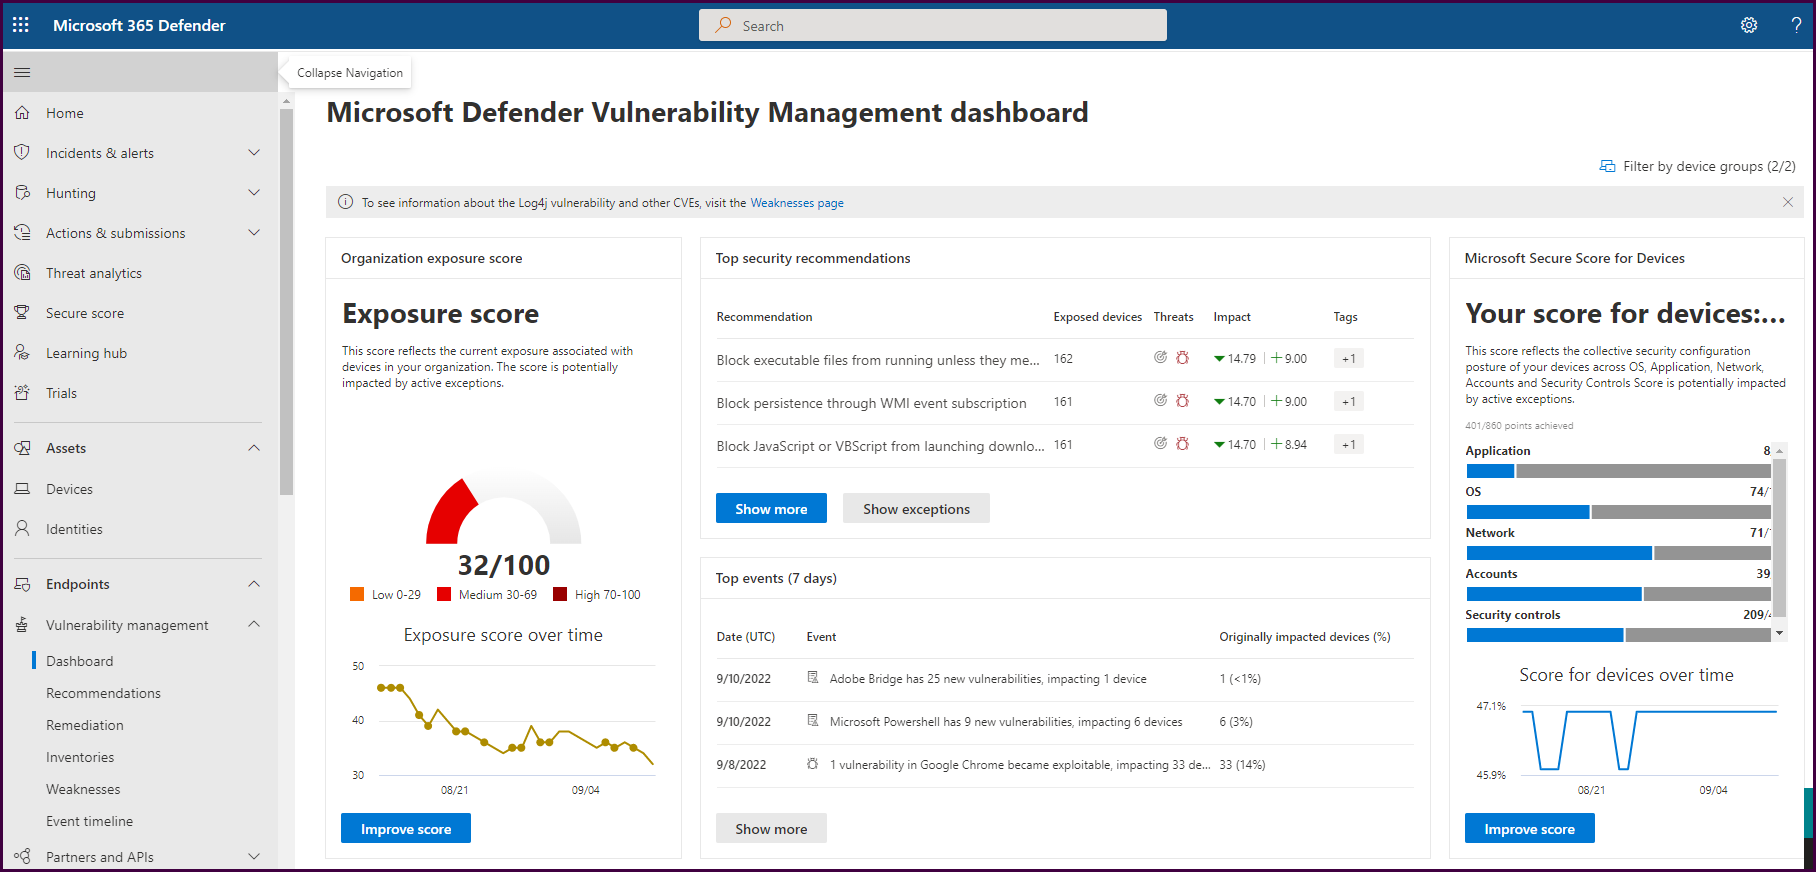
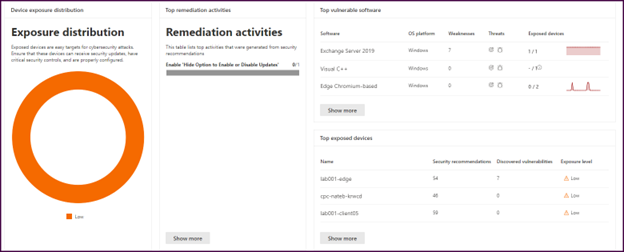
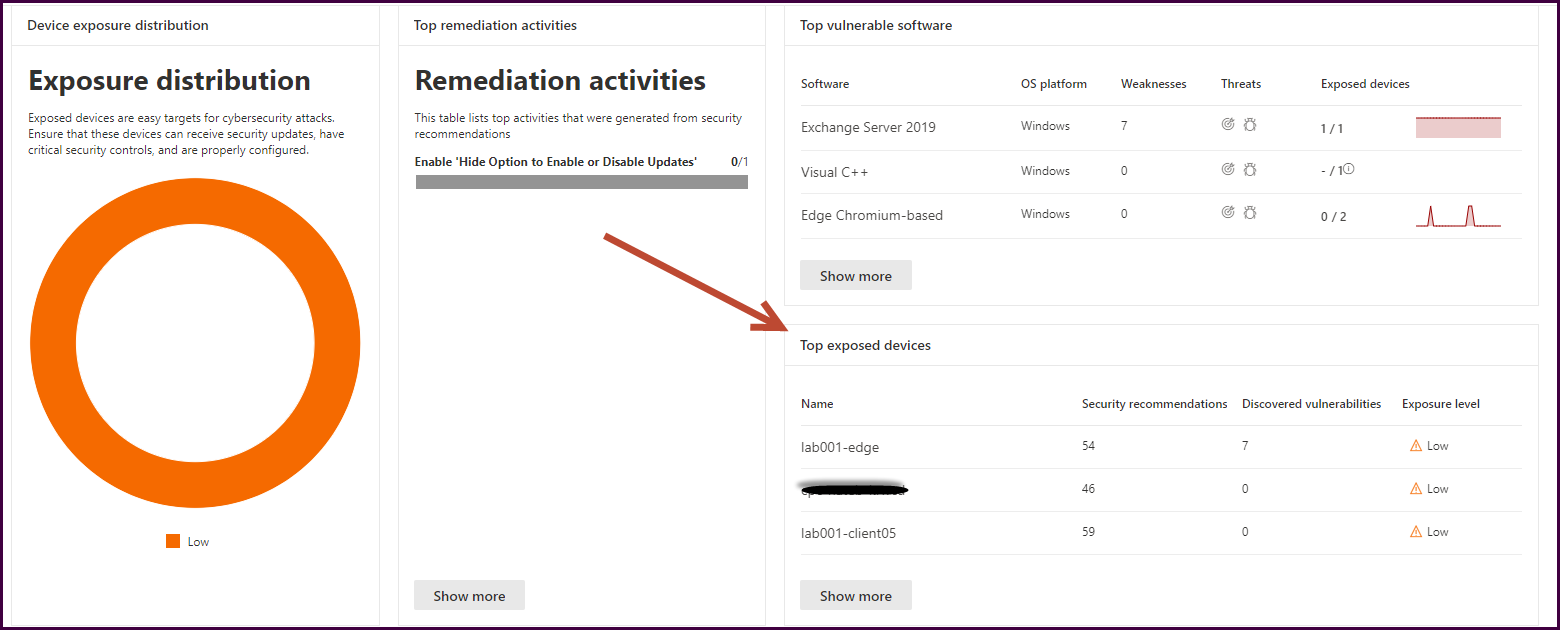
On the first half of the dashboard pictured above you will find your exposure score, secure score for devices, and if you scroll down, your device exposure distribution, top vulnerable software, and top exposed devices. You can even track remediation activities derived from security recommendations.
Next, let’s look at the event timeline. This pane displays a risk news feed to assist with mapping new vulnerabilities to devices in the organization.
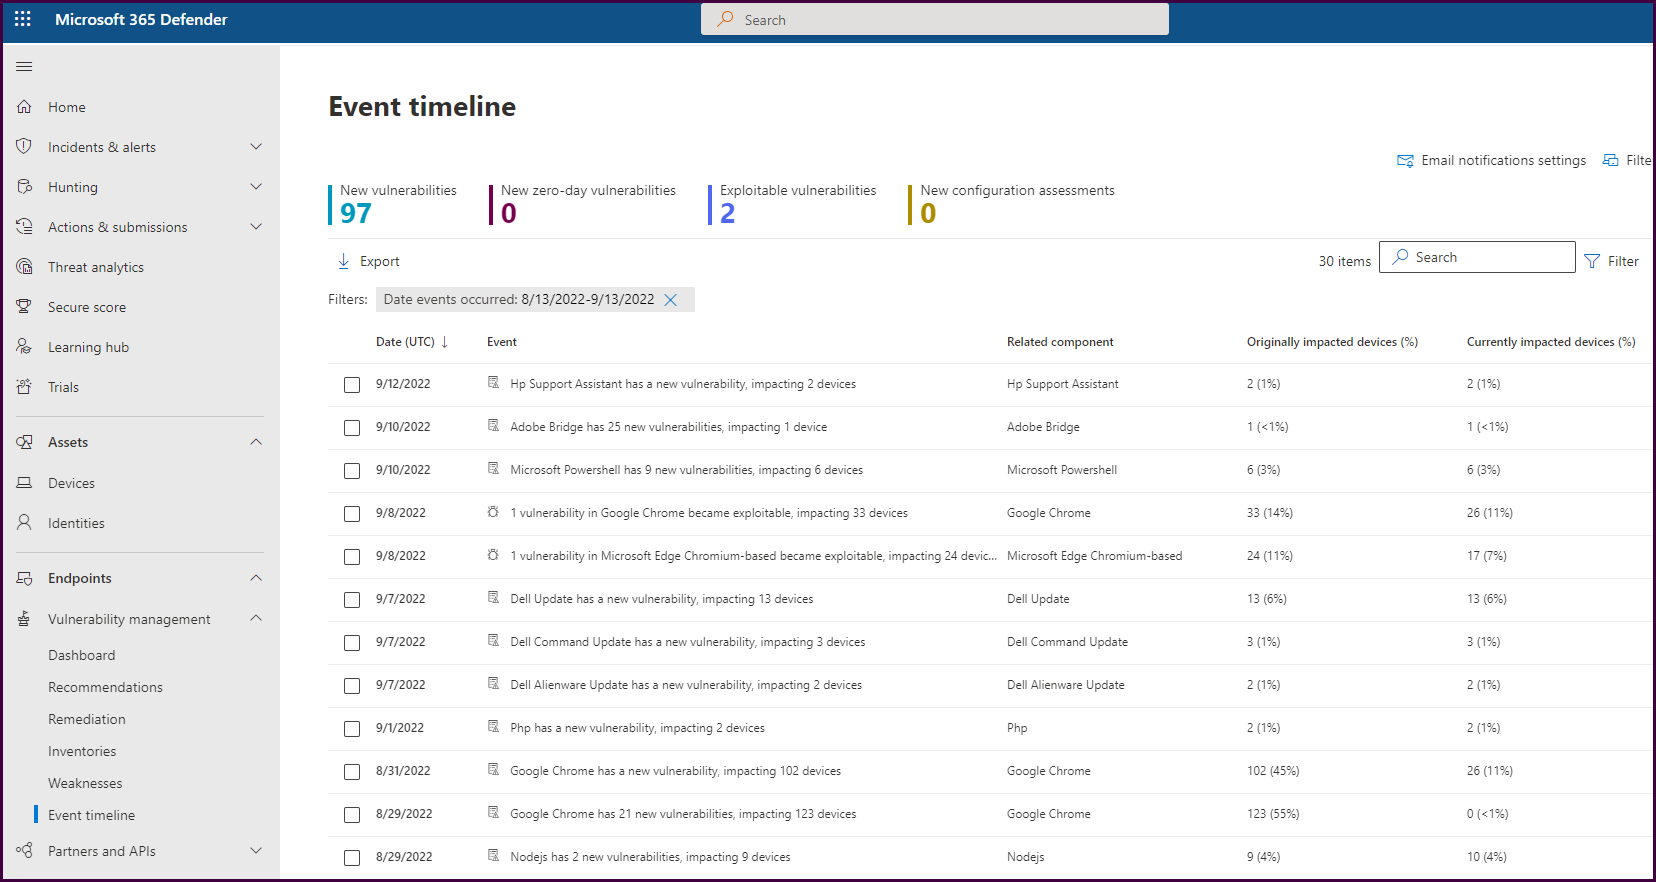
Clicking on a vulnerability event will open details about the vulnerability and how many devices were and are still impacted.
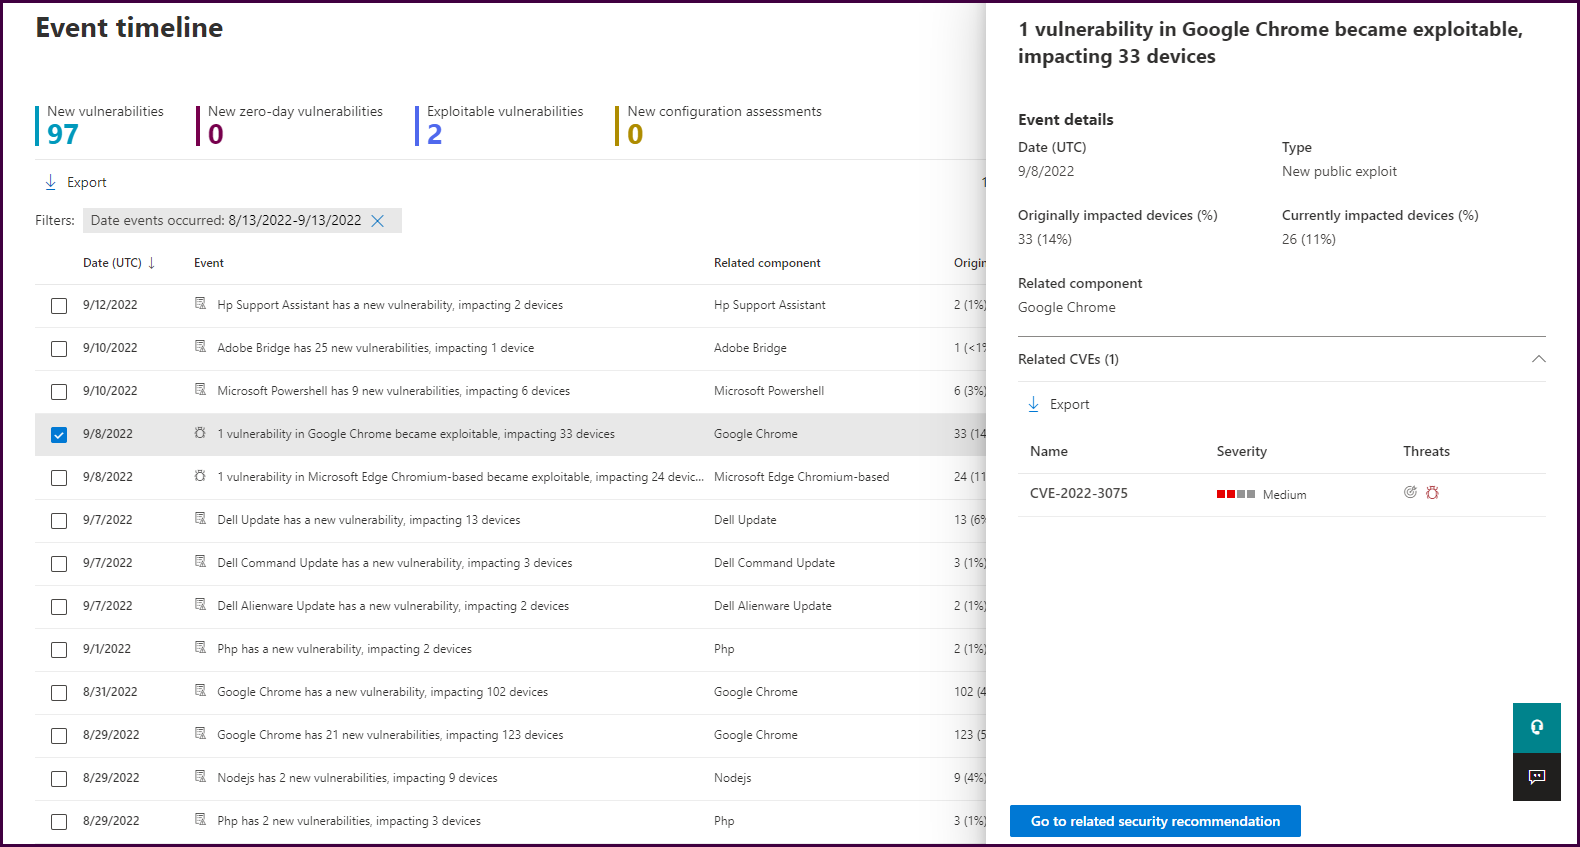
From here, you can select “Go to related security recommendation” to learn how to remediate devices.
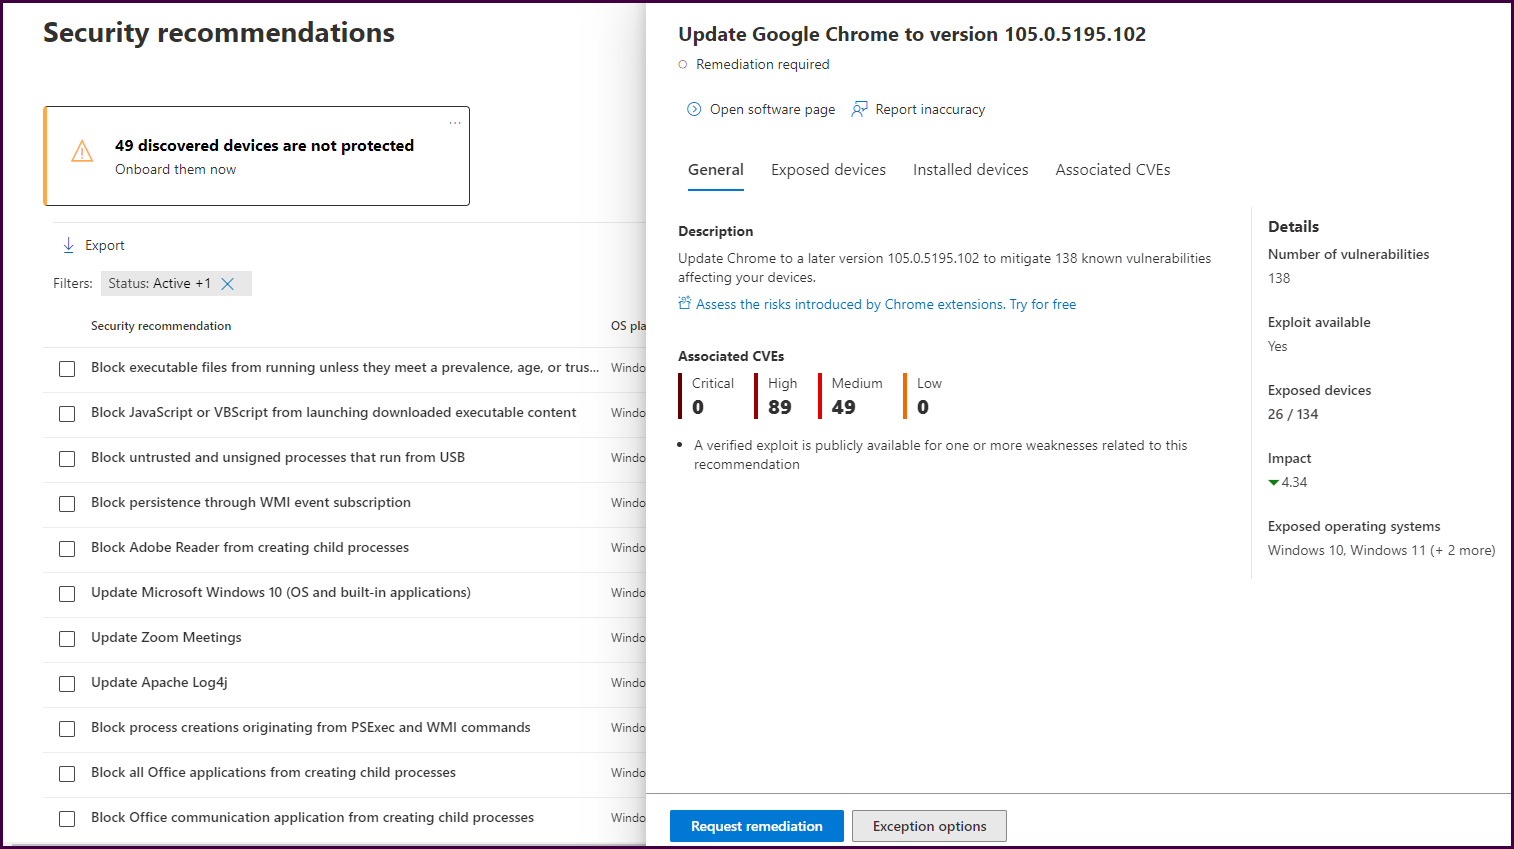
Here we can see that updating to a later version of chrome will fix the issue. You can also view a list of exposed devices, devices that already have an adequate version installed, and associated CVE information.
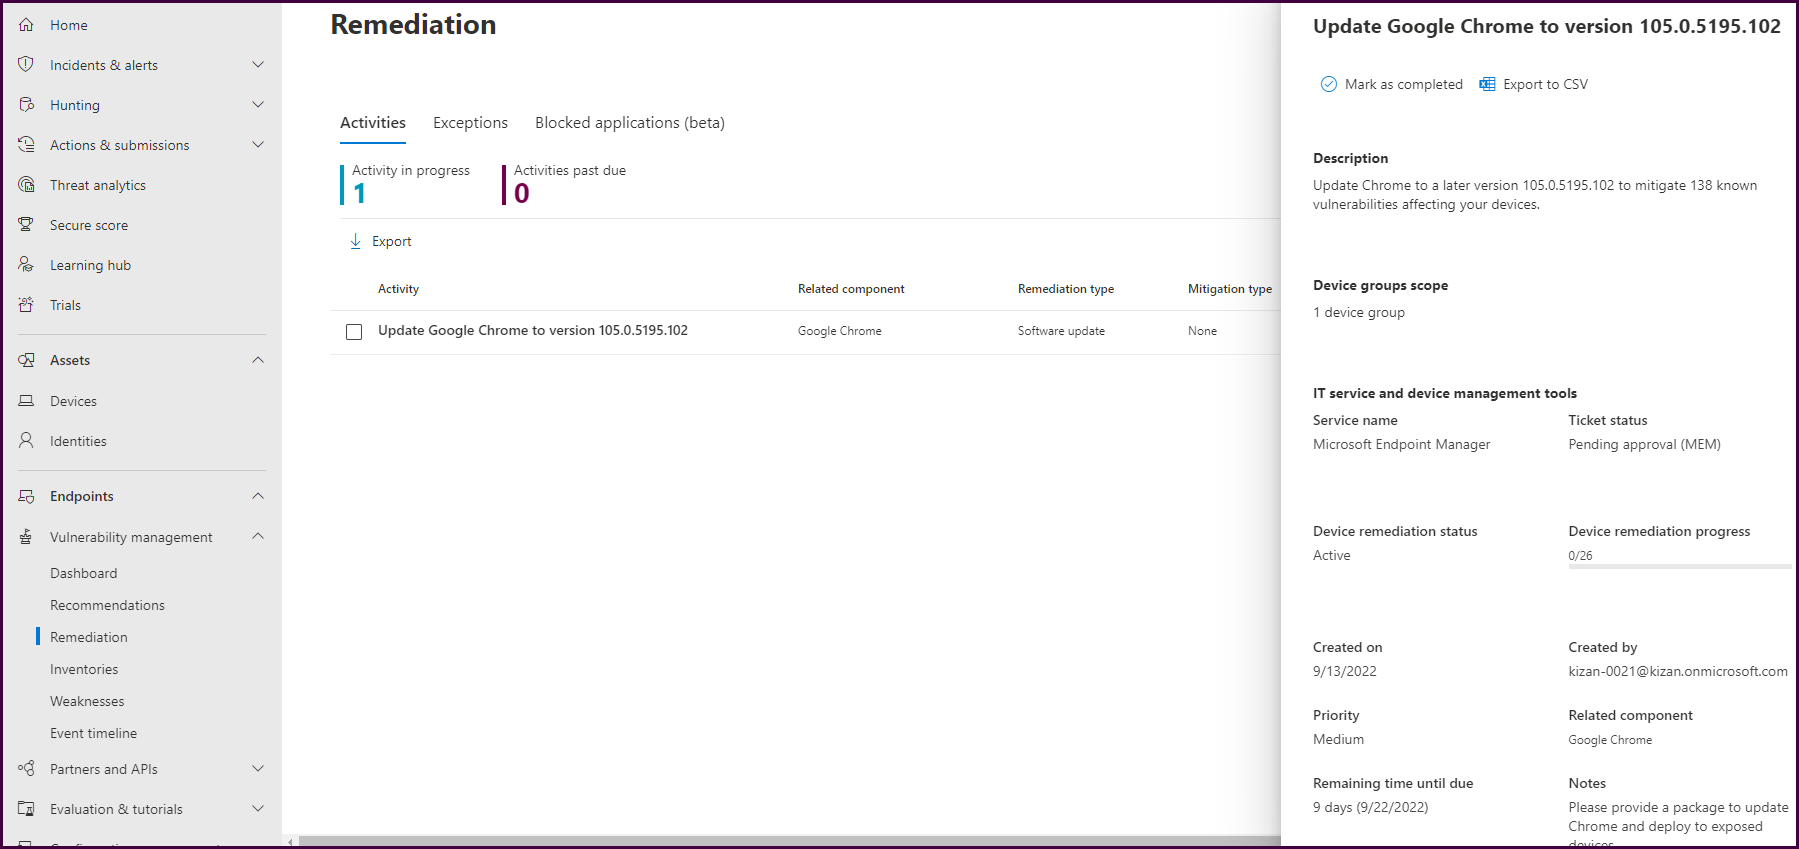
Now, let’s request a remediation by selecting “Request remediation." This will open a form to complete a remediation request.
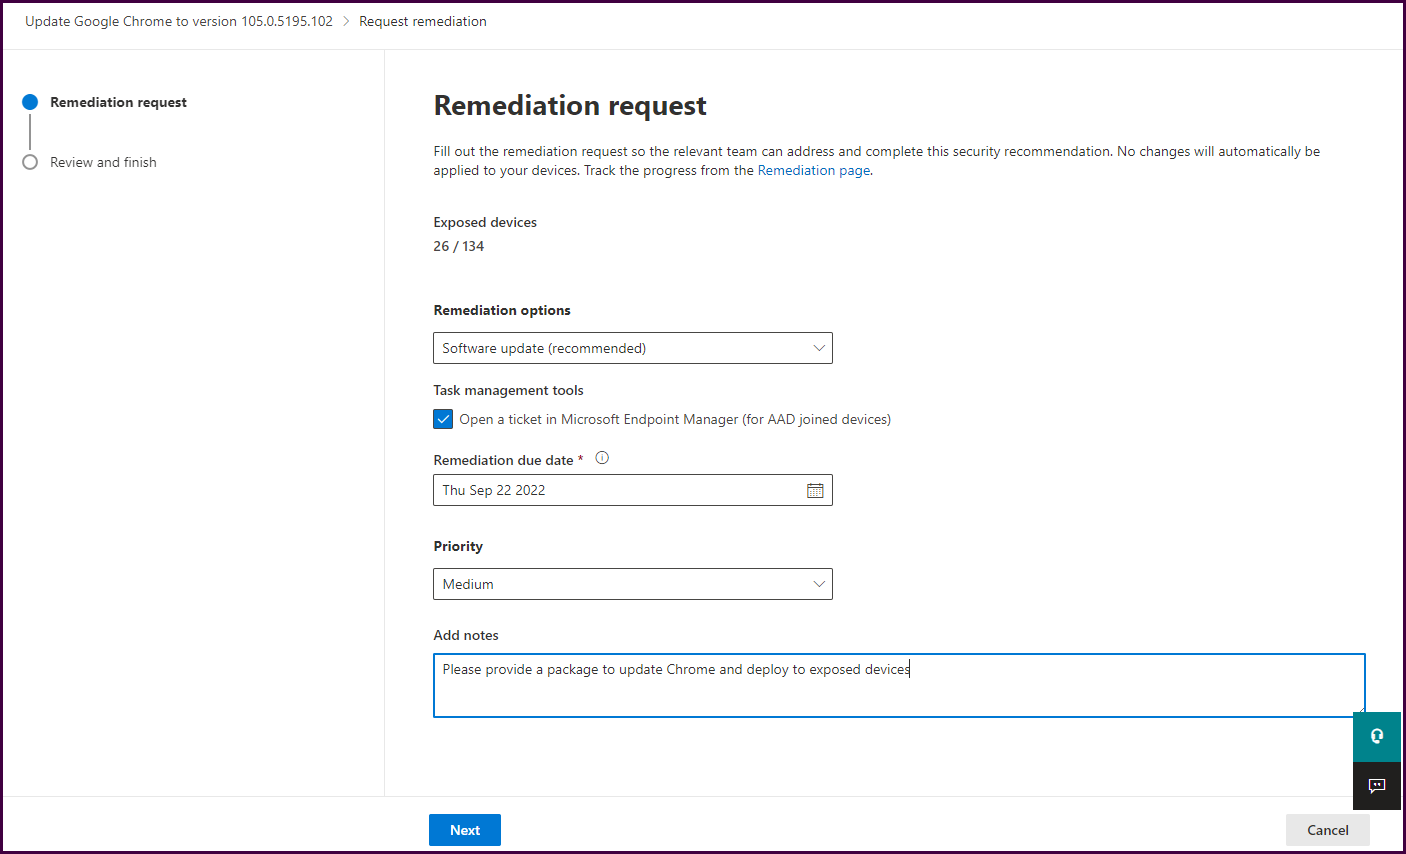
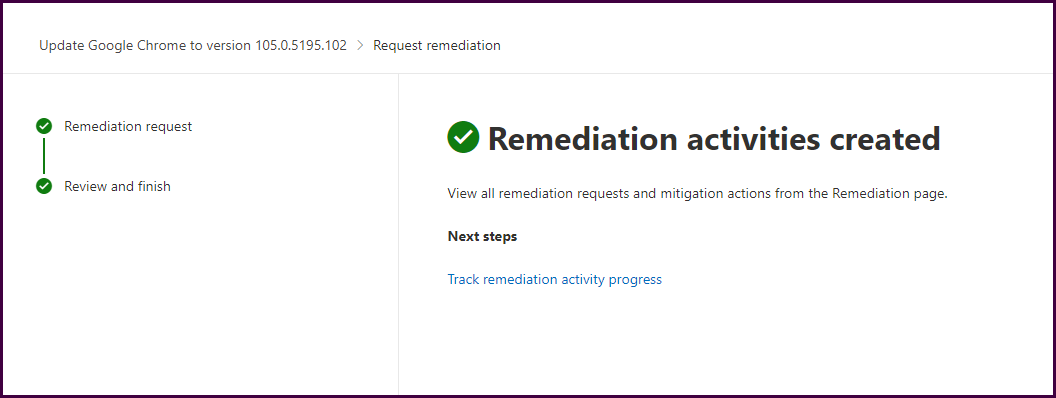
Now these remediation requests can be tracked from within the security portal.
If you navigate directly to the “Recommendations” pane, you will see a list of actional recommendations prioritized by highest exposure risk to help focus on the most impactful remediations.
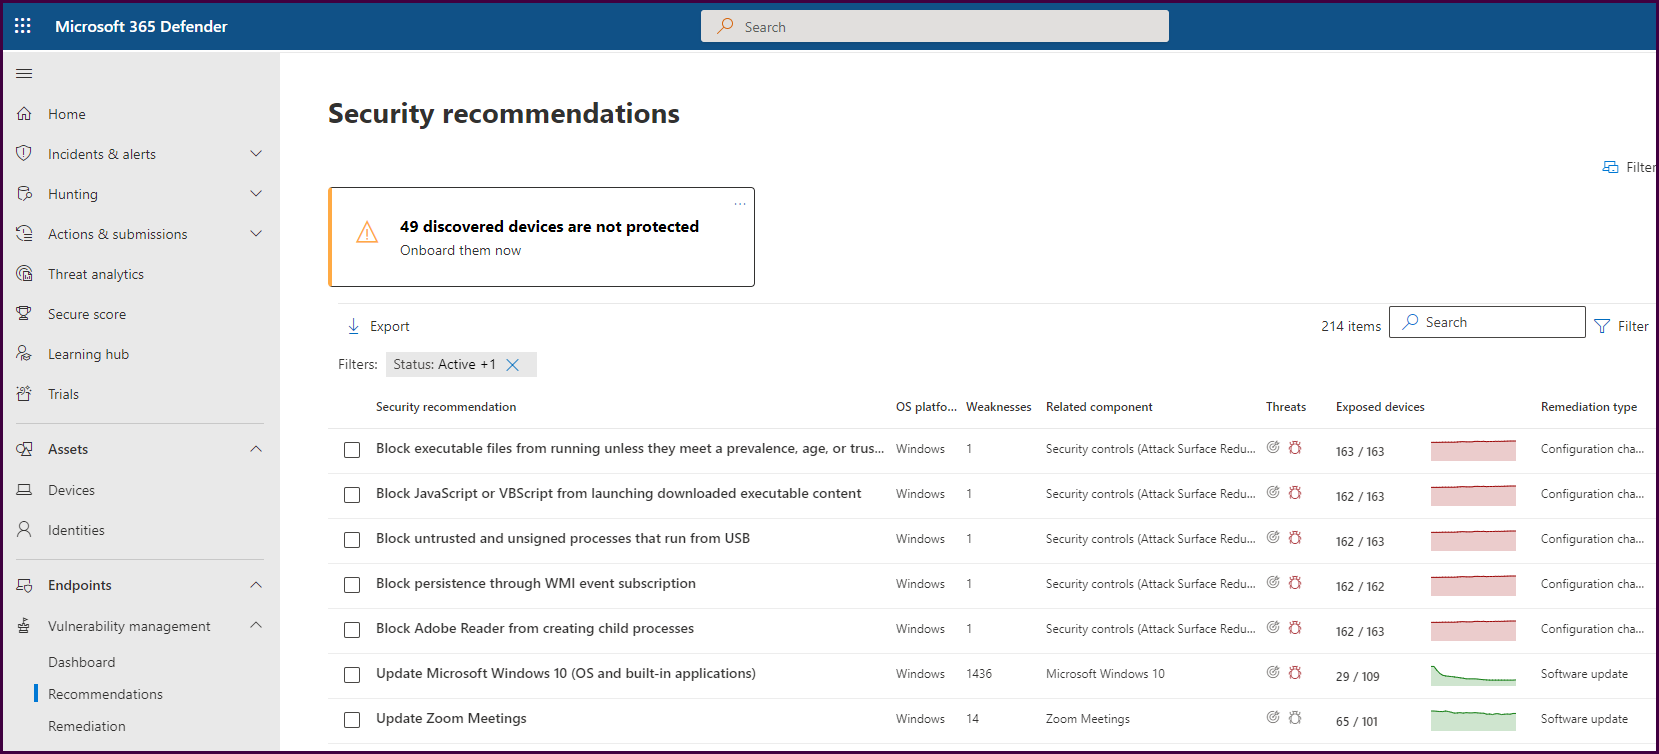
Now, hover over the “threats” icon for a vulnerability to see threat insights provided by Microsoft Defender threat analytics.

Now let’s select a vulnerability and review the remediation recommendations.
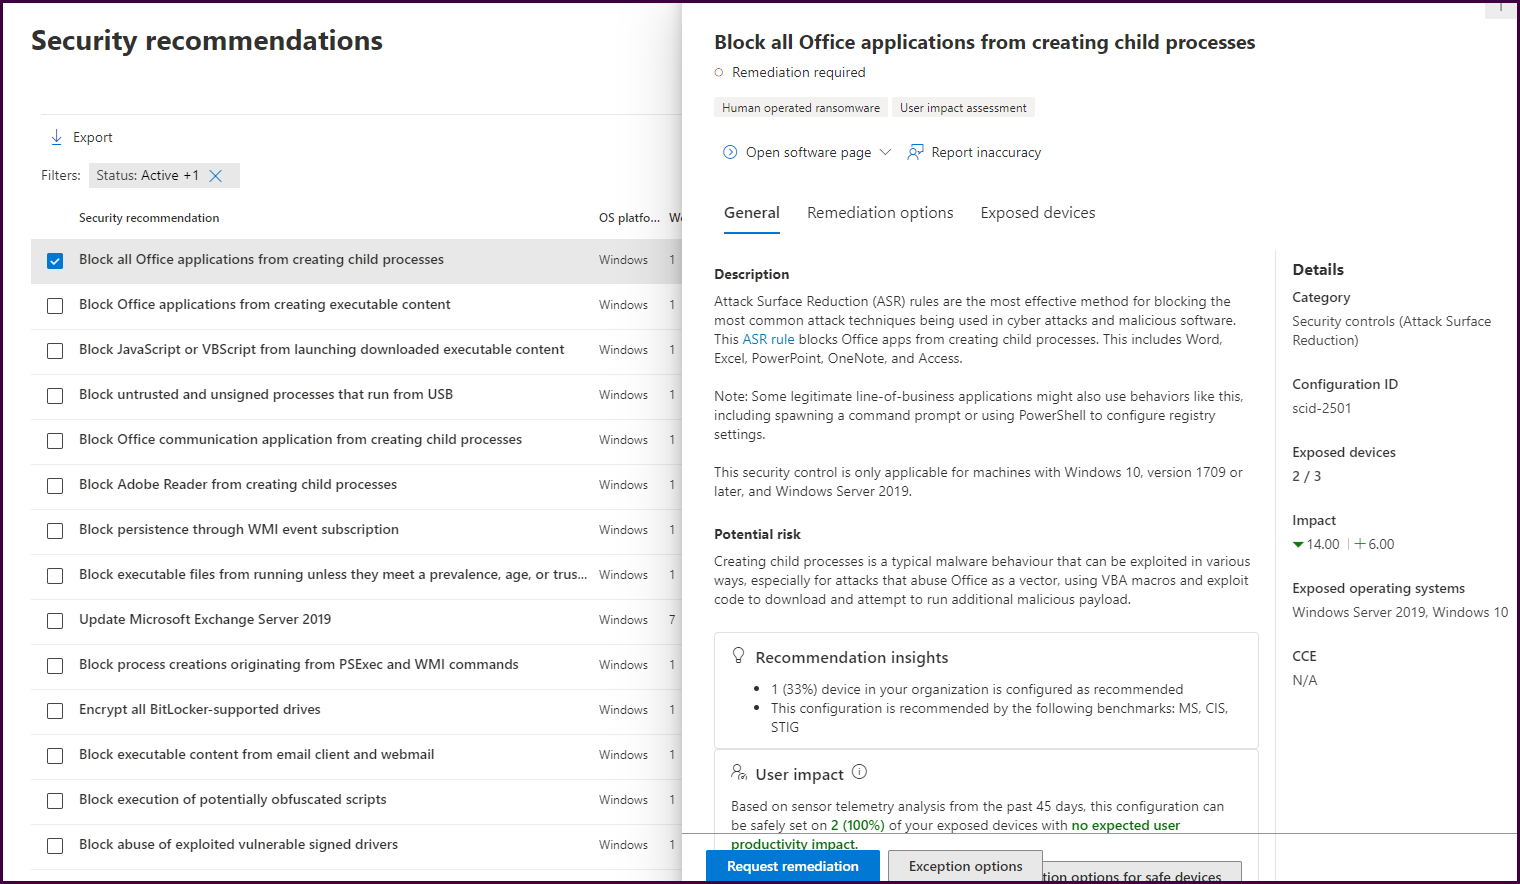
The “General” tab will list a description of the security recommendation including the potential risk, user impact, and saturation of the vulnerability in the environment. Select the “Remediation options” tab to see Microsoft’s recommended approach to mitigate the vulnerability.
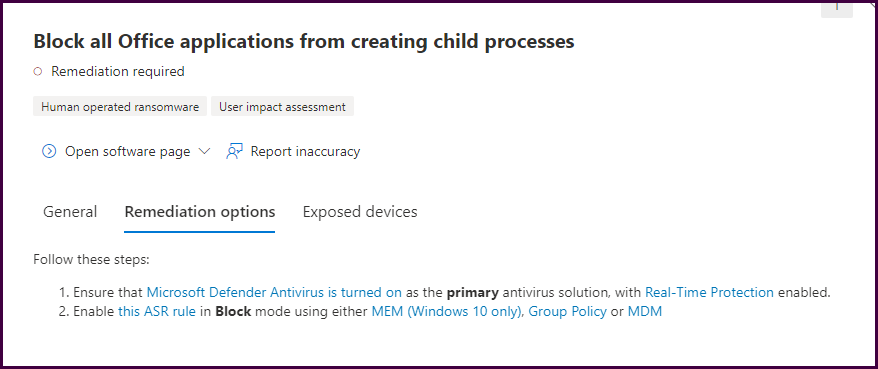
Here we will see listed remediation steps with helpful links that provide guidance. This will help save time and ensure you are reducing the organization's attack surface with every security recommendation remediation.
Now let’s look at the “Inventories” pane to see what software provides the most vulnerability for the organization.
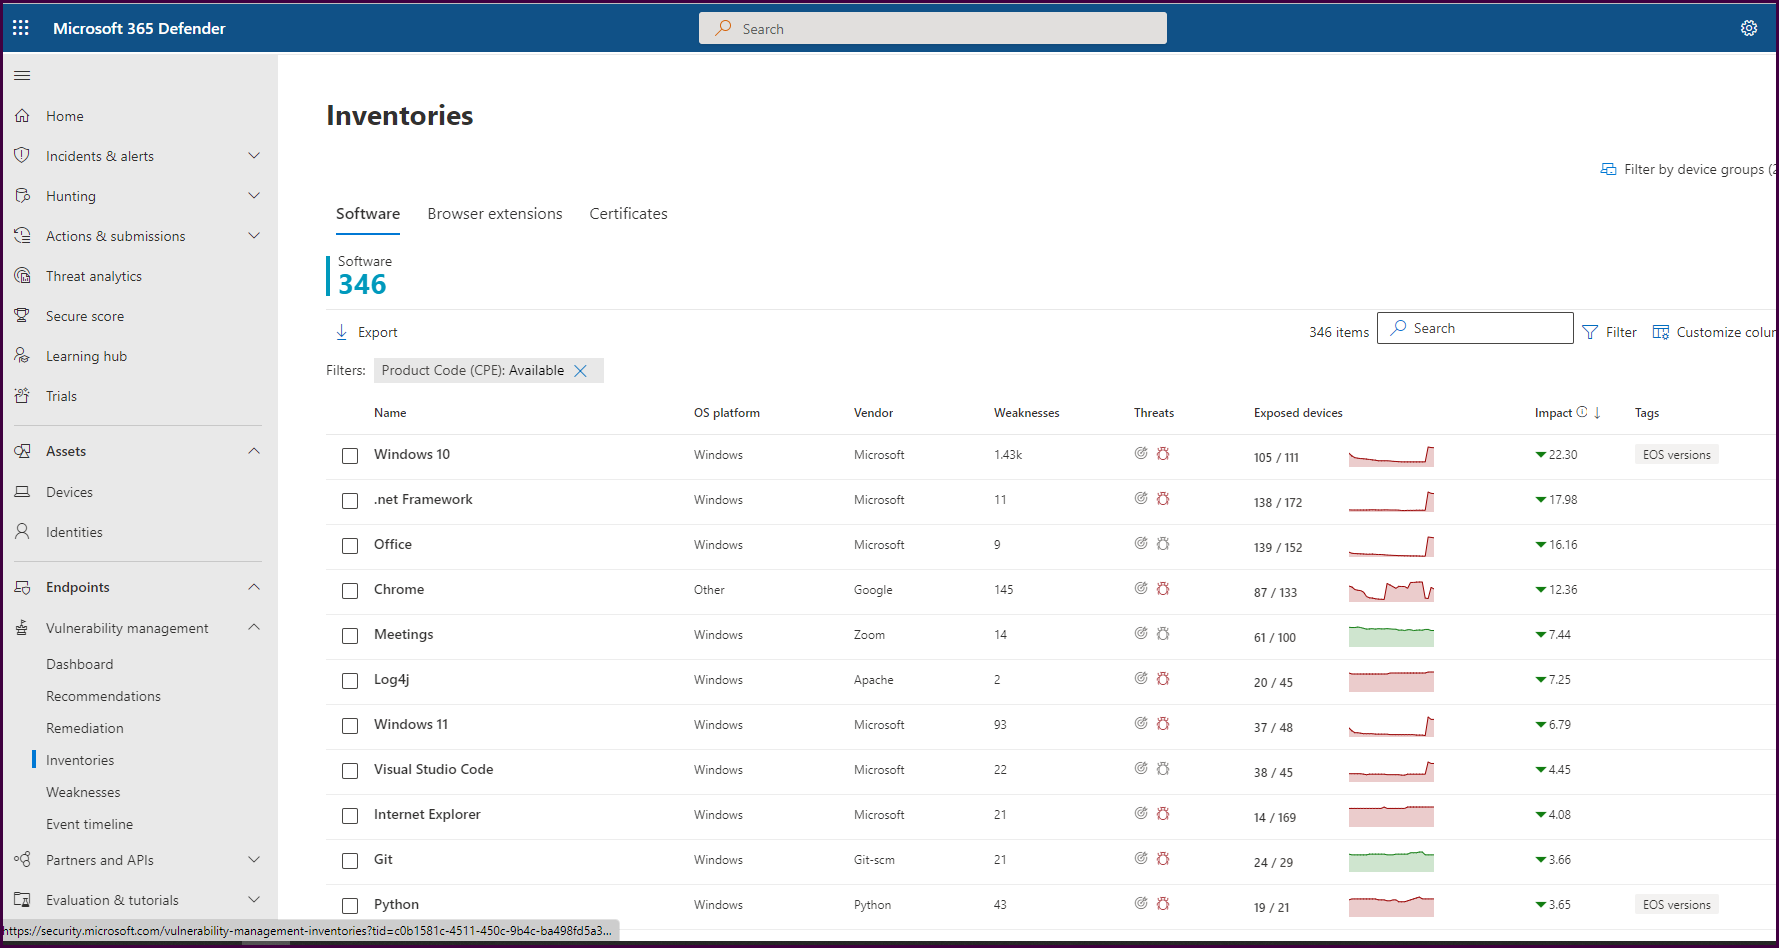
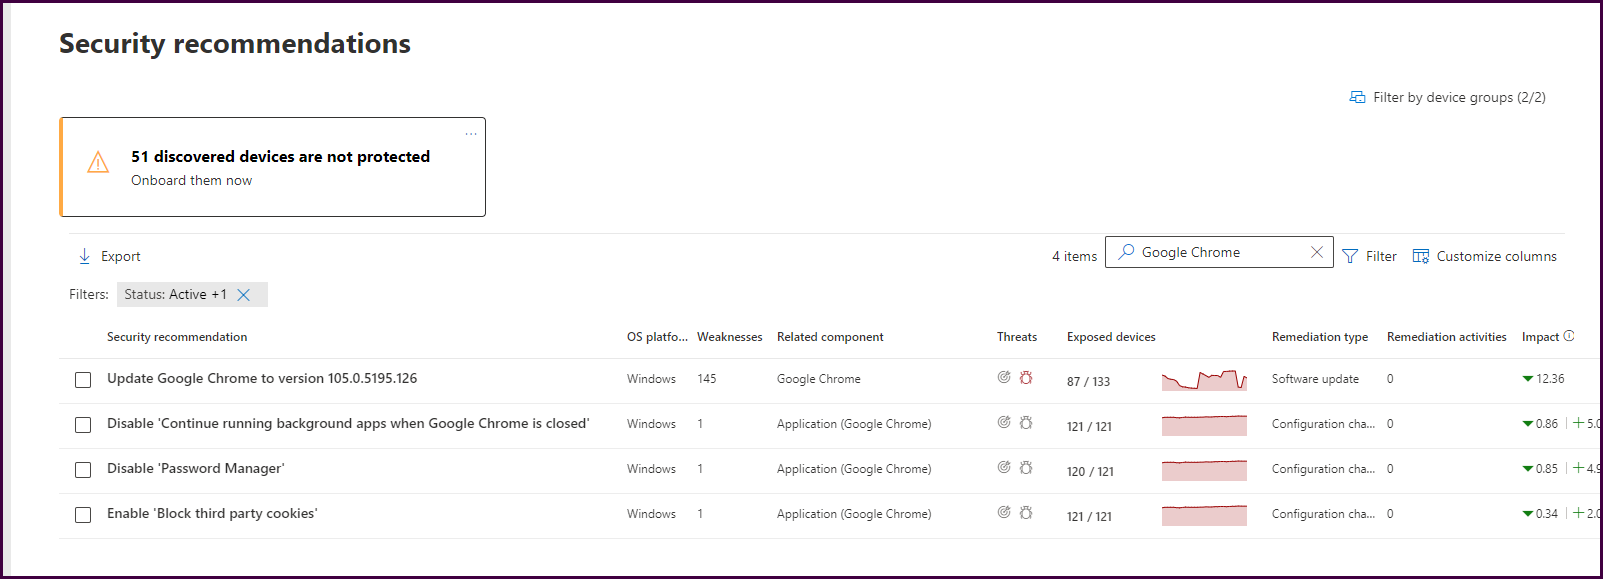
This view shows us all the inventoried software mapped to weaknesses and exposed devices. We can see updates are needed for Windows 10, .net Framework, and Office (M365 apps). It’s clear that patches were recently released. This is expected. If we look beyond Microsoft products, we will find Chrome to be our biggest offender, followed by Zoom meetings and Log4j. If you select Chrome, then select “go to related security recommendation," you will see all the security recommendations related to Chrome. Creating remediation requests from each of these will help track the mitigation of the associated vulnerabilities.
Let’s take another approach. How can we see our most vulnerable endpoints? Navigate back to the dashboard, scroll down, and select “Top exposed devices."
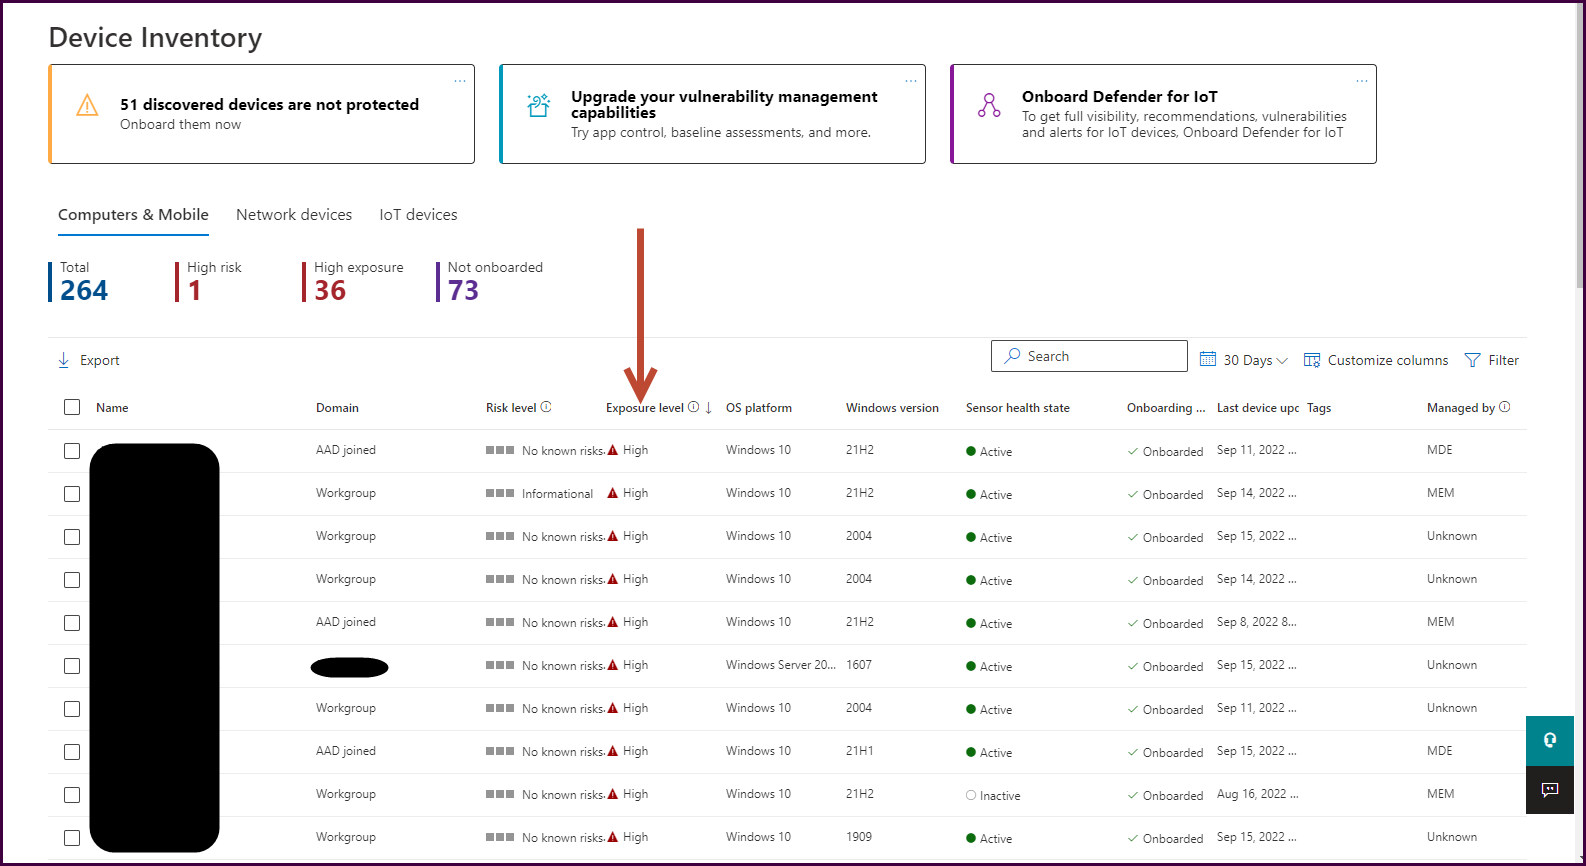
Now you can better understand which devices need the most attention from a vulnerability perspective and create the remediation actions necessary to better protect the environment.
Next, let’s look at the “Weaknesses” blade. It will automatically sort by unmitigated vulnerability prevalence to bring the most impactful vulnerabilities to the surface. You can use the filter to customize what you see here.
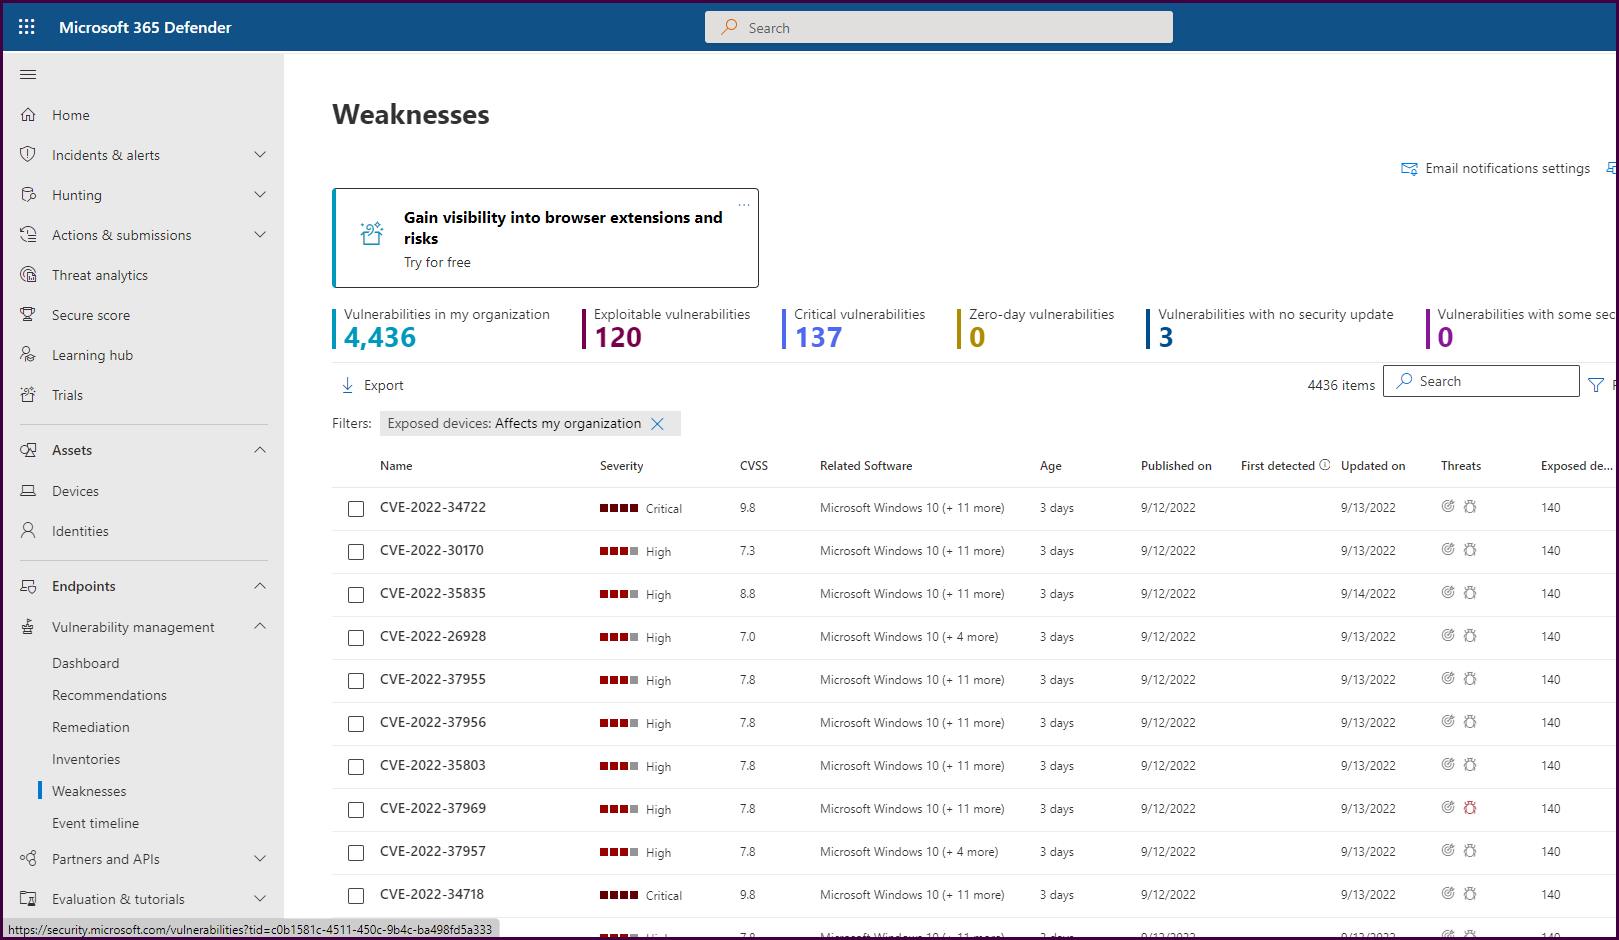
Drilling down into each of these will give you options to create remediation requests as we have seen throughout the product.
After familiarizing yourself with the console, notifications can be configured for the proper recipients.
Navigate to the “Settings” pane and select “Endpoints.”
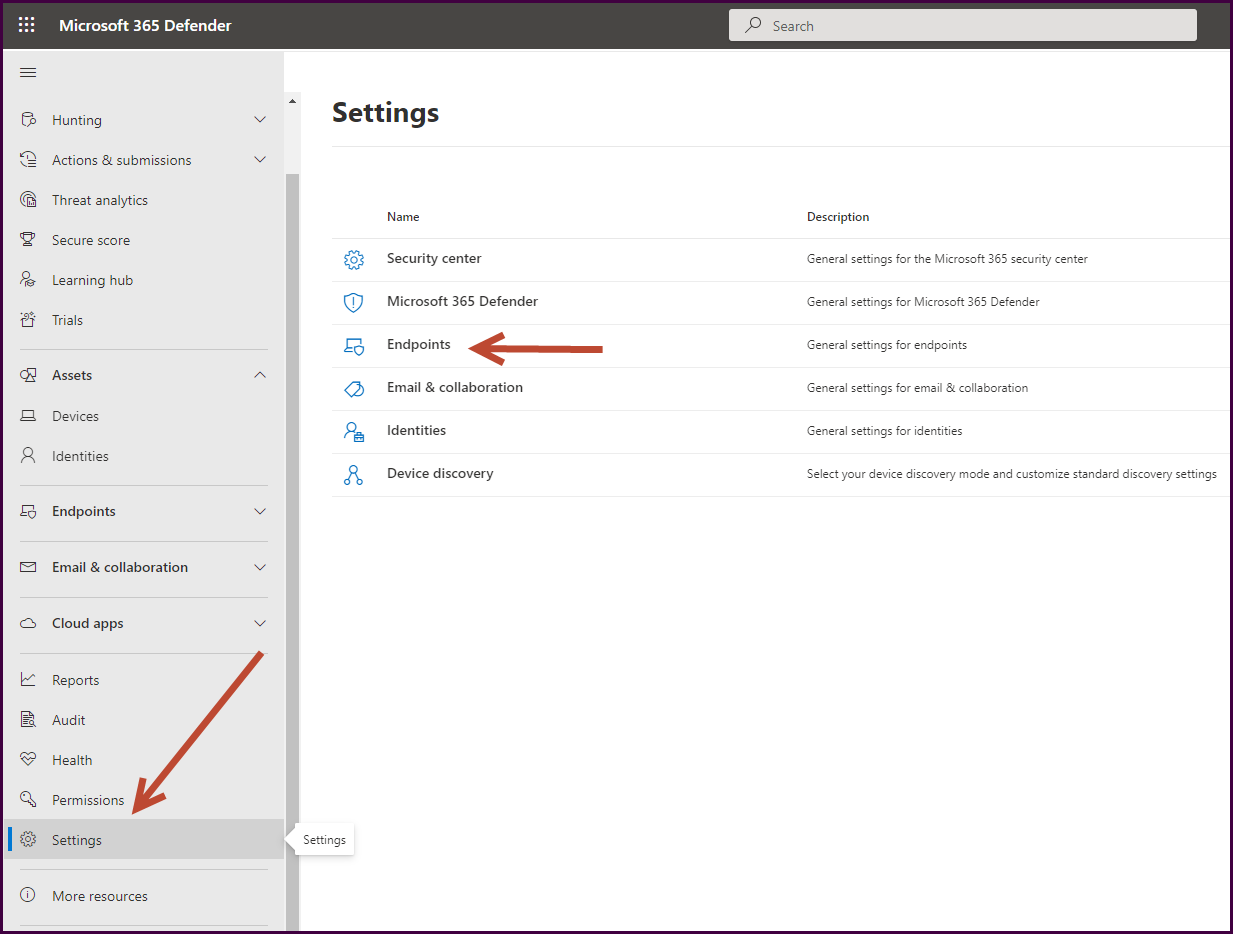
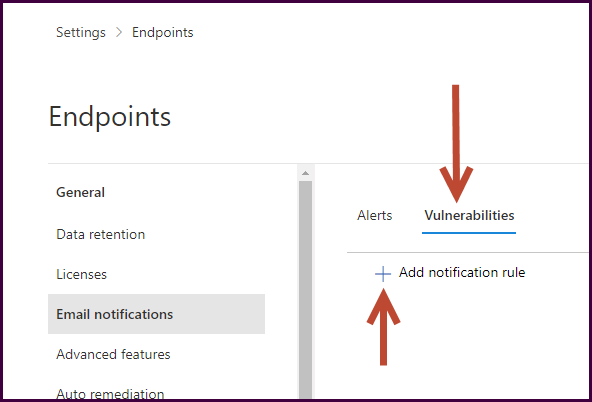
Select “Email notifications," choose the “Vulnerabilities” tab, then “Add notification rule."
Supply a name for the notification and a description if desired, then select “Next."
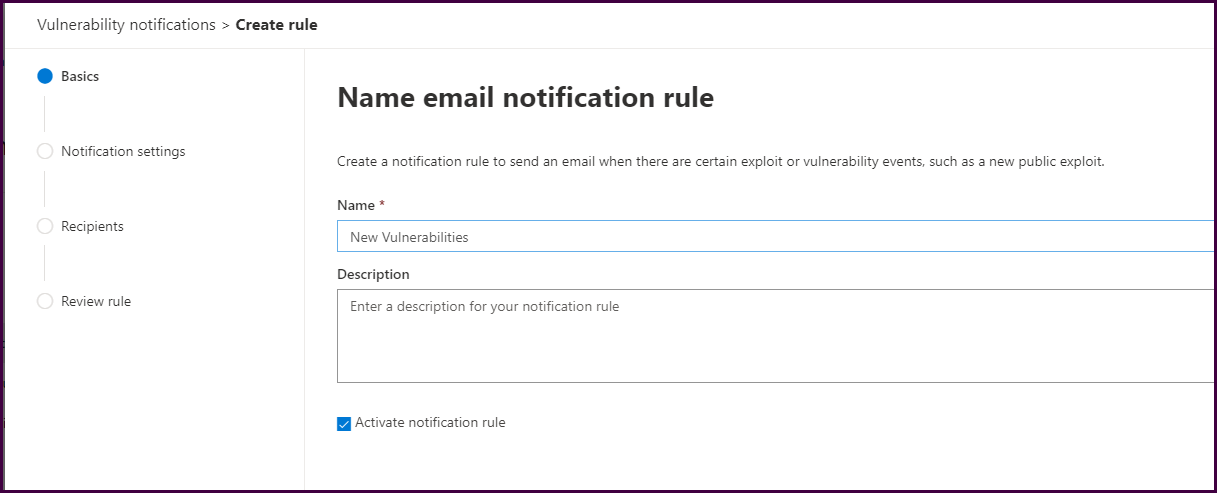
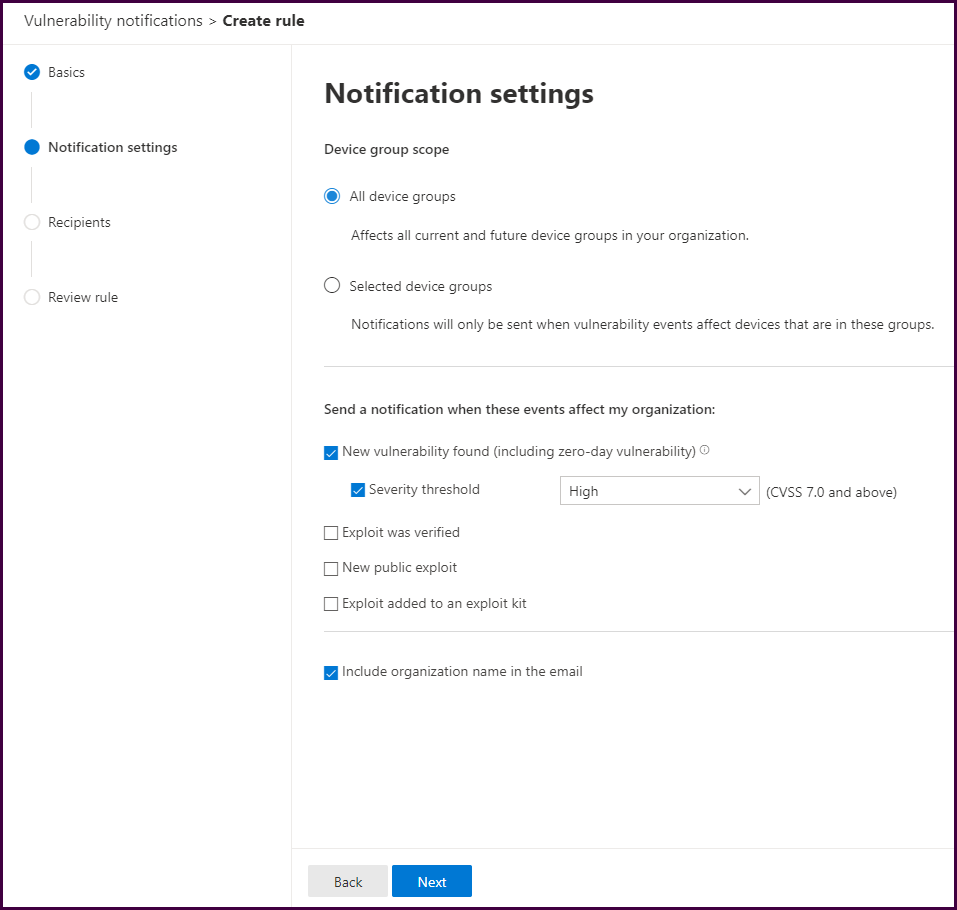
Configure the notification. Below we have configured to notify on new vulnerabilities with a severity threshold of High or Critical.
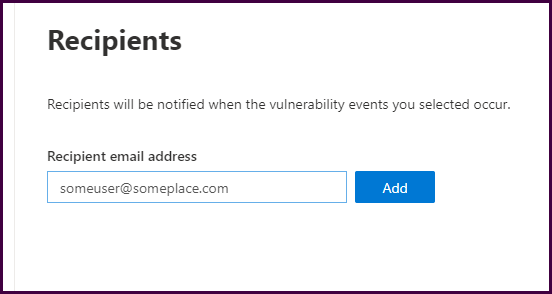
Add notification recipients.
Then complete the wizard to complete the wizard.

And finally, check out the reports!
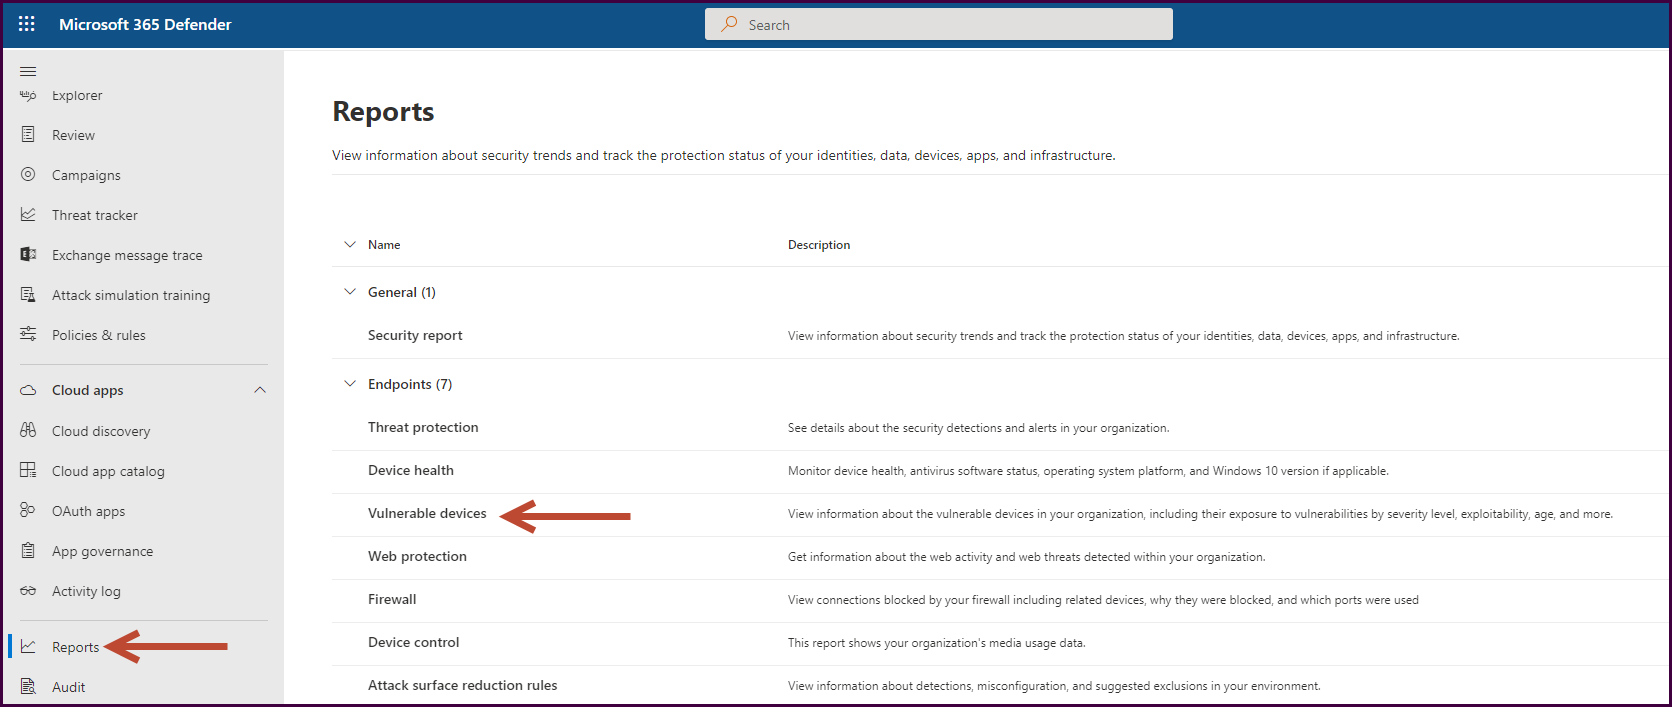
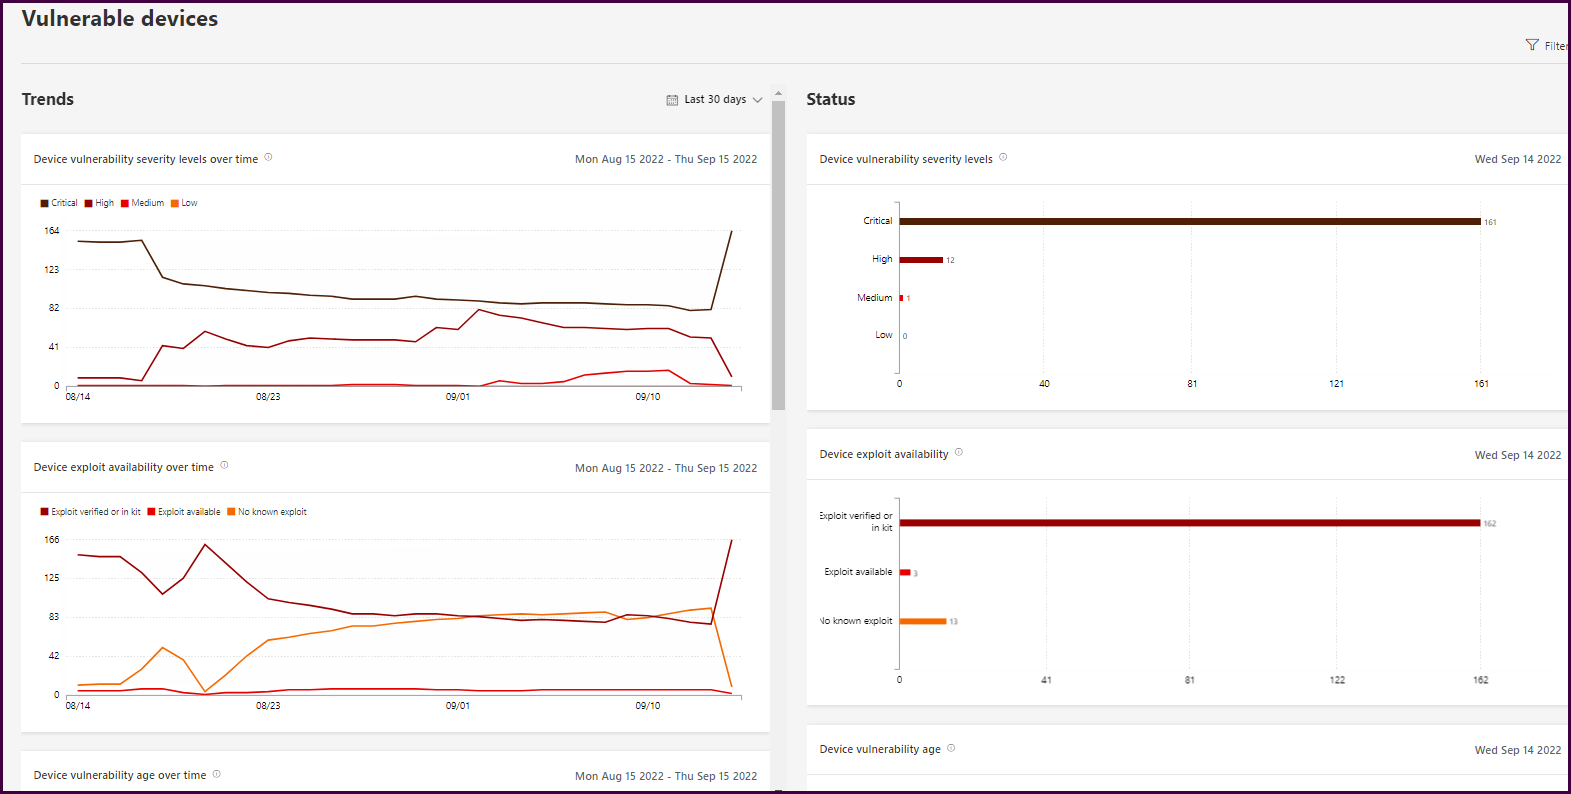
If you’ve made it this far in this lengthy post, it should be clear what value MDVE has when it comes to endpoint security. If you are using Microsoft Defender or Endpoint, you can get started today! If you are not, get the 120-day standalone trial and start gathering this information to see the same type of data you see in this post.
If you want to see the additional capabilities, subscribe to the KiZAN blog mailing list, or follow us on LinkedIn to be notified for Part 2 where we will review the additional capabilities available in the add-on and standalone versions.
Demo | Workshop | Managed Service
Learn how Microsoft Defender Vulnerability Management can identify vulnerabilities and remediate weaknesses in your organization.
KiZAN is a Microsoft National Solutions Provider with numerous gold and silver Microsoft competencies, including gold data analytics. Our primary offices are located in Louisville, KY, and Cincinnati, OH, with additional sales offices located in Tennessee, Indiana, Michigan, Pennsylvania, Florida, North Carolina, South Carolina, Georgia and Texas.


