
In today's fast-paced business landscape, staying ahead of the competition requires efficient and effective solutions. According to Microsoft’s Work Trend Index, nearly 70% of employee report that they don’t have sufficient time in the day to focus on “work”, with more time being spent Communicating than Creating.
Microsoft 365 Copilot is designed, with Microsoft’s cloud trust platform at its core, to allow for employees to both be more productive, reduce the time spent searching for information, performing mundane tasks, and other low-value activities.
For some recent project work, I found myself building and rebuilding the same or similar Azure environments and resources specific to Azure data workloads (Azure Data Factory, Synapse, etc.). I’ve been interested in DevOps for some time and the combination of these things led me to dig into Infrastructure as Code.
I thought I’d share some of my recent experiences and learnings. Specifically, as it relates to automating and managing deployment of Azure Data Factory environments and resources.
- Infrastructure as Code (IaC)
- Azure Data Workload Environments
- Microsoft Azure Bicep
- Get Started with Bicep
- Create Azure Resources with Bicep
- Bicep Code Modules
- Key Vault and Security Resources
- Storage Account and Related Resources
- A Word About Resources Dependencies
- Deployment Scripts
- SQL Server Resources
- Azure Data Factory and Resources
- Parameters
- Review Deployments
- Azure Data Factory
It’s a common buzzword/term these days, but what is Infrastructure as Code? IaC is a software engineering methodology that involves managing and provisioning infrastructure resources using code and automation techniques. It treats infrastructure configuration, deployment, and management as software artifacts, enabling infrastructure to be versioned, tested, and deployed using the same practices as software development.
Traditionally, infrastructure provisioning and management involved manual processes, where system administrators would configure servers, networks, and other infrastructure components manually. With the overwhelming move to the cloud, there is no longer the need (or even the ability) to physically touch or access servers, switches, or any hardware. So, some form of automated / logical deployment is only natural. Treating infrastructure as software allows you to leverage many of the same DevOps methodologies and practices you may be using already. Is allows you to manage your infrastructure and cloud environments as part of the same CI/CD processes.
Within IaC, infrastructure resources are defined in human-readable configuration files, or code, that describe the desired state of the infrastructure. IaC code is typically some form of domain specific language using a declarative syntax that includes some form of programming control constructs, variables, etc. These code files can then be stored in a version control system, allowing teams to collaborate, review changes, and track the history of infrastructure configurations.
IaC tools interpret the code and interact with the underlying platforms to create, modify, or delete the required resources. They ensure that the infrastructure's actual state matches the desired state specified in the code, and any differences are automatically reconciled.
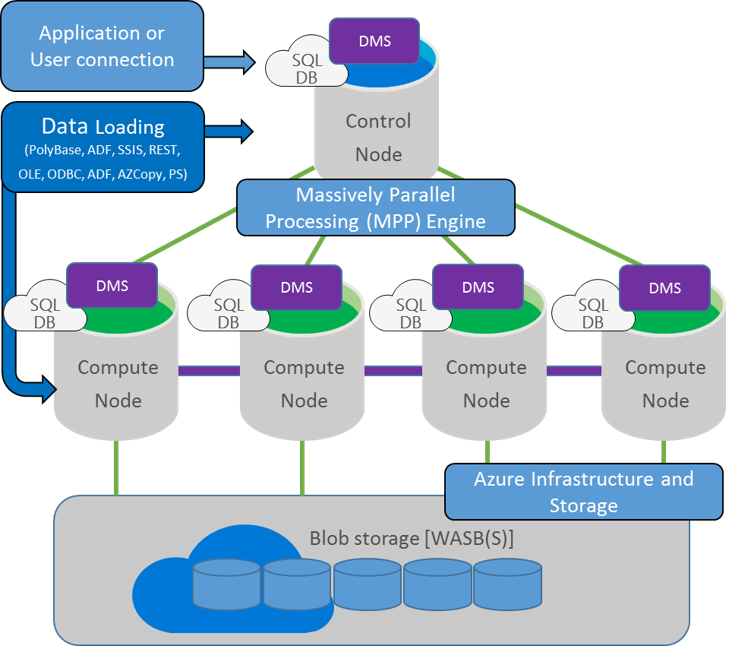
For my recent project, the IaC approach was particularly appealing because I needed to deploy the same, or similar, data engineering environments repeatedly. Based on situation-specific criteria, I needed to deploy various workload environments in specific, pre-defined ways. For this article, I’ll focus specifically on building an Azure Data Factory and related resources.
Clients often don’t have a lot of experience with the data engineering and analytics environments I’m building for them. So, in addition to configuring and deploying the actual working environment, the IaC process allows me to ‘embed’ some standard best practices, coding samples and other aids into the deployment process. Some practices I typically try to suggest to customers include:
- Using Key Vault to store and manage secrets
Store credentials, connection strings and secret values in an Azure Key Vault. Retrieve secrets from Key Vault directly from your data factory assets to control access to these secrets and reduce the risk of accidental exposure. - Using Managed Identities
Managed Identities provide an additional layer of security by enabling Azure resources, such as Data Factory, to authenticate and access other Azure resources without the need for explicit credentials. Use Managed Identities to establish secure and seamless communication between resources without the need to manage and transmit credentials. Using a Key Vault to safely manage secrets relies on the Data Factory system assigned managed identity. - Leverage parameters to create reusable, generic data factory assets
Parameters provide a way to easily adjust specific attributes of data factory assets, such as connection strings or file paths. This allows you to reuse them in varying scenarios without having to create multiple objects to do similar things to different objects.
In addition to consistently providing standard best practices in deployed environments, IaC gives me the opportunity to provide a basis for some knowledge transfer and training on the solutions by deploying sample files and other training assets. As you’ll see below, I use an IaC approach to deploy not just a data factory, but linked services, datasets, pipelines and sample data files. All these assets are defined via IaC to work together and demonstrate recommended way to use these assets.
For the project I was working on, my needs were specific to Microsoft Azure. Multi-cloud, on-prem or hybrid environments just didn’t come into play. There are many IaC languages and tools out there that address all these areas. They all have their pros and cons, and I don’t intend to get into recommendations or evaluations here. Although, Terraform does seem to be the de facto standard in this space.
Azure Resource Manager (ARM) is the deployment and management service for Azure. You can define and deploy Azure resources using ARM templates. But ARM templates are ‘lots of JSON’ and I find them hard to read and difficult to work with. As the Azure platform has evolved, Microsoft has provided Azure Bicep. Bicep is a declarative domain specific language used to define and deploy Azure resources. Bicep is really a “transparent abstraction” over ARM and ARM templates providing a much more concise and readable syntax, reliable type safety, and support for code reuse. Anything you can do or deploy in Azure or with ARM can be done in Bicep. All resource types, properties, API versions and new features available via ARM are available via Bicep. In my case, that meant some newly released and preview features I wanted to leverage were available right away.
The easy way to get started with Bicep is to use the Azure CLI. The Azure CLI automatically installs the Bicep CLI command set. If you don’t already have the Azure CLI installed, you can find out how to do that here.
Verify the Bicep command set installed and check installed version:

Visual Studio Code offers a first-class authoring experience for your Bicep solutions via the Bicep for Visual Studio Extension. If you plan to do anything with Bicep and don’t have this extension, get it now.
Bicep Extension for Visual Studio Code:
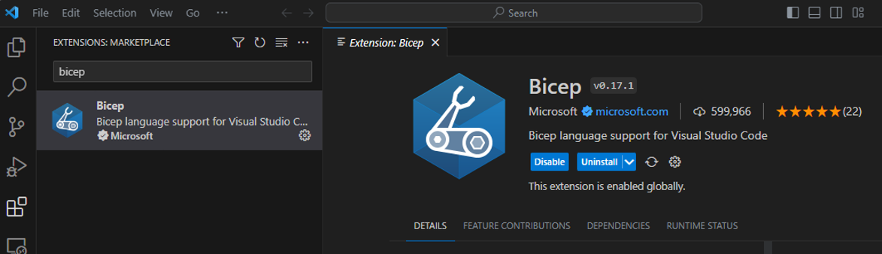
The Bicep extension provides all the language support, IntelliSense, autocompletion, etc. you expect with any first-class programming language.
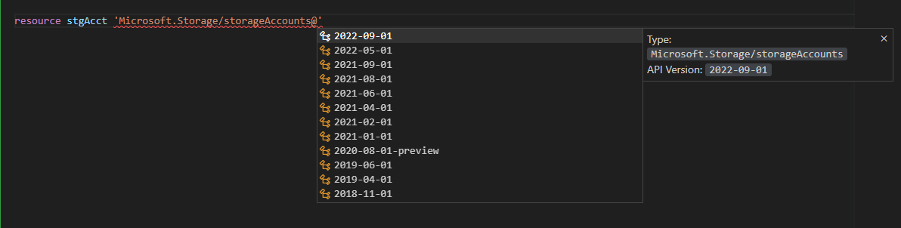
The extension provides support for all resource types and API versions:
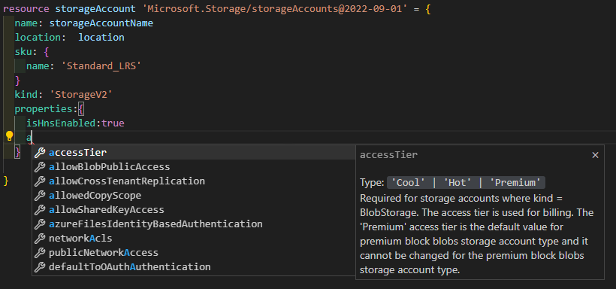
Extension Supports All Properties and Values for All Resource & Modules:
In my case, all my resources share the same life cycle and I want to manage them as a group. So the first thing to do is create a new resource group.
You can see the full code of the Azure Data Factory deployment in this repo bafridley/IaC (github.com). In addition to the main module, I have individual modules to deploy Key Vault, Storage, SQL Server and Azure Data Factory resources.
Create a new resource group for all new resources:
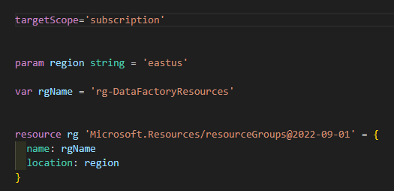
- By default, a Bicep deployment is scoped at the resource group level. To create a new resource group within a subscription, change the scope of the deployment to the subscription level.
- Bicep supports the use of parameters and passing parameter values at run time via the command line. In fact, it’s best practice to not hard-code values for things like regions. In this case, region is defined as a command-line parameter with a default value of ‘eastus’ if no value is passed into the module. More on parameters later.
- Bicep also supports variables using the var keyword. Variables are declared untyped and the type is inferred from the value assigned. In this case, rgName is a string variable.
- The resource ‘rg’ is defined as type ‘Microsoft.Resources/resourceGroups’ and using the ‘API version 2022-09-01’.
- The resource properties ‘name’ and ‘location’ are assigned the values contained in the parameter and variable.
With the simple Bicep code above saved to file called ‘main.bicep’:
Execute the deployment from the Azure CLI:

- A location must be specified at run-time to execute the deployment (‘-l eastus’). This is the location/region where deployment metadata will be stored, not necessarily where resources are deployed.
- ‘eastus’ is passed as value to ‘region’ parameter
Bicep enables you to organize deployments into modules. A module is an individual Bicep file that is deployed from another Bicep file. Modules can improve code read ability and allow a module to be reused in other deployments. In the example below, separate module files exist for the Key Vault (‘kv.bicep’) and Storage Account (‘stg.bicep’) deployments. These can all be referenced and deployed from the main bicep module (‘main.bicep’).
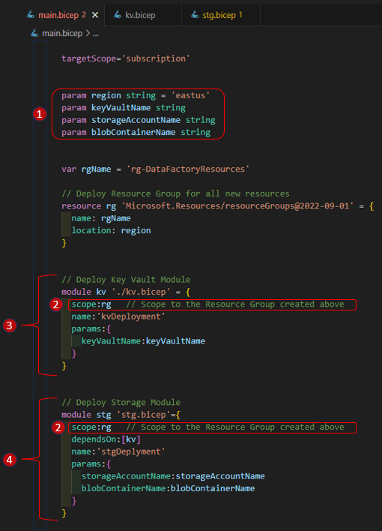
- Define parameters for ‘region’ and resource names (key vault, storage account and container). These parameters are passed into ‘main.bicep’ from the command line at execution time and then to other modules as needed.
- After resource group ‘rg’ is created, adjust the scope of other deployment modules to this resource group using the ‘scope:’ argument
- ‘kv.bicep’: bicep file to deploy a Key Vault and supporting resources. The deployment is named ‘kvDeployment’ (we’ll review this in the Azure Portal later). ‘keyVaultName’ is passed as a parameter to the deployment.
- ‘stg.bicep’: bicep file to deploy a storage account, blob container and associate resources. The deployment is named ‘stgDeployment’ and is dependent on module ‘kv’ being completely deployed and available (‘stgDeployment’ adds secrets to the Key Vault). Use the ‘dependsOn:’ argument to define this dependency
Execute the deployment from the Azure CLI:

- Use the same syntax to deploy the simple ‘main.bicep’ module earlier
- From within ‘main.bicep’, reference and deploy ‘kv.bicep’ and ‘stg.bicep’
- Pass all the defined parameter values
As mentioned earlier, a Key Vault is the recommended way to store, manage and consume secrets. I manage all the Key Vault resources, as well as, some other ‘security and authorization’ resources in the ‘kv.bicep’ module. Using a Key Vault with Azure Data Factory relies on using a managed identity, either the system assigned managed identity or user assigned managed identity. I use a user assigned managed identity for other reasons as well, so it’s included in my ‘kv.bicep’ module as well.
Define a User Assigned Managed Identity:

Add the newly created Managed ID to the system-defined Contributor role:
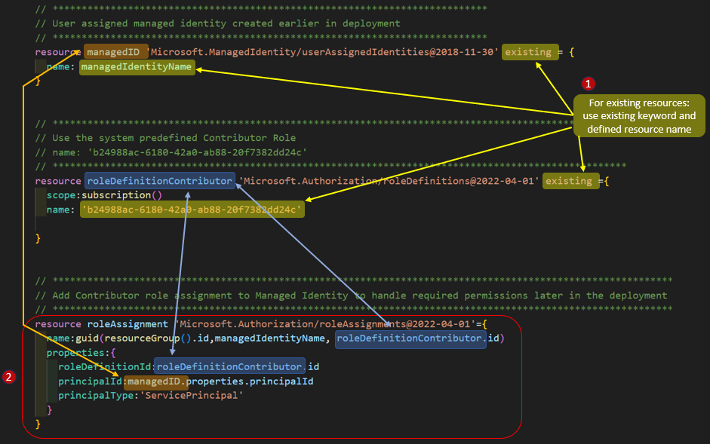
- To use any resource that already exists (vs. defining/deploying a new resource), use the ‘existing’ This can be any existing resource, either system-defined or user-defined. Identify the existing resource by the name argument used in the resource definition.
- Create a new roleAssignment that adds the previously created user assigned managed identity (‘managedID’) to the existing system-defined Contributor role.
Create Key Vault, Policies and Secrets:
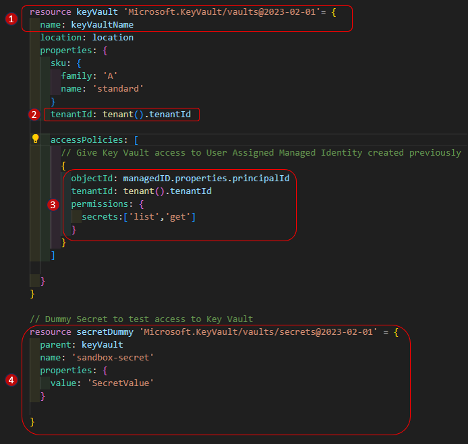
- Create a Key Vault resource using name in parameter ‘keyVaultName’
- Notice the use of the ‘tenant()’ function to return scope of active tenant and associated ‘tenantID’. Bicep provides a wide range of functions (resource, scoping, string, date, file, etc.) you can use throughout your deployment scripts. For more details, see the Bicep functions reference.
- Create a Key Vault access policy assigning ‘list’ and ‘get’ permissions for secrets to the managed identity created earlier (‘managedID’)
- Utilizing the practice of least necessary permissions, assign minimum permissions to only secrets since that’s all that the Data Factory will be using
- Create a dummy secret to test Key Vault access
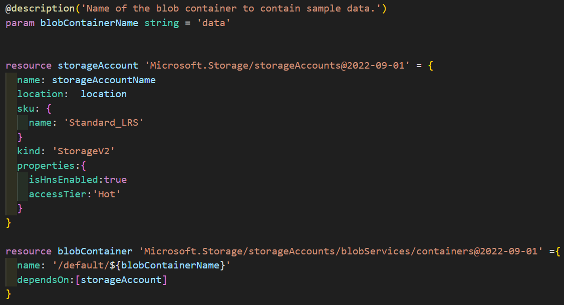
Having a low cost, LRS storage account with blob container is a default in every Azure subscription I use. My Data Factory example uses a blob container called ‘data’ to hold sample text files and other data.
Create storage account and blob container:
Add Access Key and Connection String Secrets to KV:

- Store the Access Key for the storage account in variable ‘storageAccessKey’
- Create a connection string for the storage account in variable ‘storageConnectionString’
- Create a Key Vault Secret for the storage account access key (‘storageAccessKey’)
- Create a Key Vault Secret for the storage account connection string (‘storageConnectionString’)
At deployment, Azure Resource Manager evaluates the dependencies between resources and deploys them in their dependent order. To make deployments faster and more efficient, ARM may deploy them in parallel when resources aren't dependent on each other.
Notice the yellow wavy line under the ‘dependsOn’ property in the previous screen shot. That wavy line is the Bicep extensions way of letting you know that it’s an unnecessary (redundant) declaration. While you can manually define dependencies using the ‘dependsOn’ property, the extension will also infer dependencies from the rest of the code. In this case, the ‘storageAccessKey’ variable is assigned the value of: ‘storageAccount.listkeys().keys[0].value’. The variable ‘storageAccessKey’ is then assigned to the value property of the Key Vault Secret resource, creating an implicit dependency, and making it unnecessary to directly specify the dependency. In this way, Bicep understands and manages resource deployment to ensure dependent resources are deployed after those they depend on.
A DeploymentScript resource is a specialized Azure resource type that allows you to define and deploy custom scripts as part of your infrastructure deployments. A deployment script resource lets you execute code (either PowerShell or Azure CLI script) as part of your deployment. A DeploymentScript requires two supporting resources for script execution and troubleshooting: a storage account and a container instance. You can specify an existing storage account, otherwise the script service creates one for you.
A typical use-case for a deployment script is to create or manipulate Azure AD objects. In my case, I want to upload sample CSV files to the blob container in my storage account. In addition to deploying Azure Data Factory and associated resources, I also want to implement some samples and best practices into the Data Factory. The uploaded file will be used as part of a standard Data Factory CopyData pipeline to create a table in a SQL Server database.
Deployment Script to Upload Sample CSV file to Blob Storage:
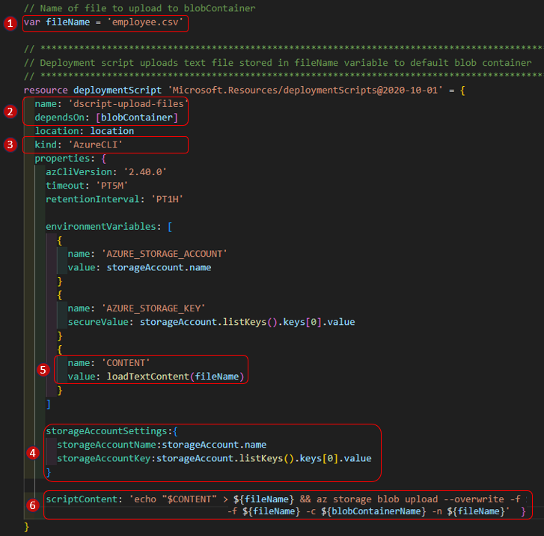
- Store the name of the file in the variable ‘fileName’. In a future revision, I want to update this code to upload all files from a specific folder. The idea being that I could put any sample data for a particular deployment in a folder and it would all get uploaded to the storage account.
- Name the resource ‘dscript-upload-files’ and make it dependent on the blobContainer resources (the container must exist before trying to upload a file to it).
- Define the type of ‘DeploymentScript’ as Azure CLI (you could also set the script type to ‘kind: AzurePowerShell’ to execute PS scripts).
- Define the storage account and access key used to execute script
- Load the contents of text file ‘customer.csv’
- Define the AZ CLI script to execute as: ‘az storage blob upload’ defining the target container and file names
Like the storage account and blob container highlighted earlier, I deploy a SQL Server and database that will be used as a source in a Data Factory pipeline. While I don’t show that here, you can see the full code of the Azure Data Factory deployment in this repo bafridley/IaC (github.com).
The Azure Data Factory module (‘adf.bicep’) contains the bulk of the bicep code in my deployment, but I won’t discuss it all here. The full code defines a data factory, linked services, datasets, pipelines, access policies, key vault secrets and more.
Define the Data Factory Resource:
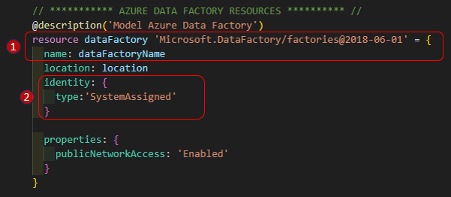
- Define the Data Factory resource using the name in the ‘dataFactoryName’ variable
- Generate and apply the system assigned managed identity for Data Factory to be used to access Azure Key Vault
Add Key Vault Policy for New Data Factory:
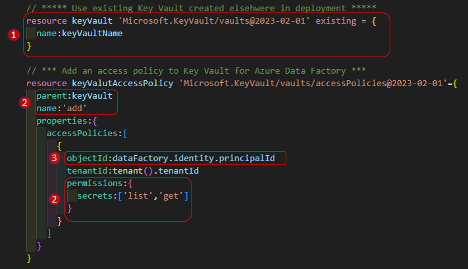
- Reference existing Key Vault created earlier in deployment using name supplied in variable ‘keyVaultName’
- Add a new Key Vault access policy, giving ‘list’ and ‘get’ permissions on Secrets
- Assign access policy to the Azure Data Factory (object ‘dataFactory’ previously defined) via the system assigned managed identity. Without this policy and set of permissions, the data factory will not be able to access the key vault.
Azure Blob Storage Linked Service:
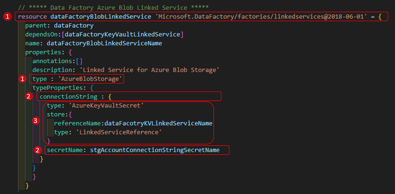
- Create a Linked Service of type ‘AzureBlobStorage’
- Retrieve and use the storage account connection string saved earlier
- Use the Key Vault linked service (see the full code in the repo for key vault deployment) to retrieve the secret from the Azure Key Vault
CSV Dataset Resource:
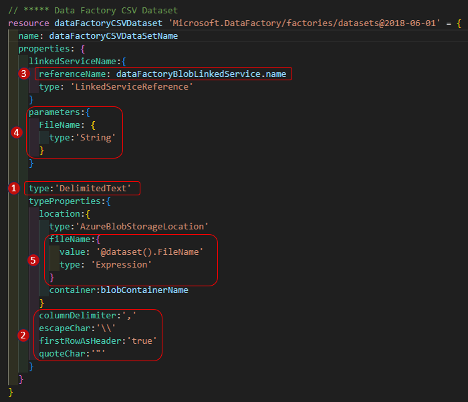
- Define a Data Factory Dataset of type ‘DelimitedText’
- Configure the text file delimiters, header and other required text file properties
- Use the Azure Blob Service Linked Service (defined earlier) as the file source
- Create a string parameter to the dataset, called ‘FlieName’. This parameter is key to the best practice I’m trying to demonstrate and will be linked to other values in a pipeline further on in the process.
- Set the filename property of the DelimitedText dataset to the dataset parameter just defined: ‘@dataset().FileName’
Data Factory Pipeline:
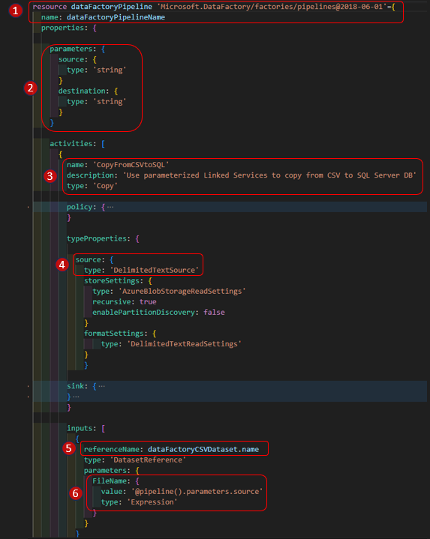
To focus on key concepts, I’ve rolled up several of the sections of the code. You can get the full code from this GitHub repository mentioned earlier.
- Define a Data Factory Pipeline using the variable ‘dataFactoryPipelineName’
- Create two string parameters, called ‘source’ and ‘destination’.
- These parameters are scoped to the pipeline where they can be set to the name of the source CSV file and the name of the destination SQL Server table at execution time.
- The parameters are passed to downstream Dataset and Linked Service objects
- Create one CopyData activity in the pipeline named ‘CopyFromCSVtoSQL’
- A source type of ‘DelimitedTextSource’ (the sink: is type ‘AzureSQLSink’, this code is rolled up to save space)
- Define the activity input as the CSV Dataset defined above (‘dataFactoryCSVDataset’)
- Pass the pipeline parameter ‘@pipeline().parameters.source’ to the ‘FileName’ parameter defined on the CSV DataSource object (‘dataFactoryCSVDataset’).
For the first pass of this solution, I wanted to make it flexible and reusable. Providing different values for the parameters allows for deploying many different environments with the same basic code. While all the parameters make the solution flexible, it can be tedious to declare all those parameters and pass them to and from all the different modules. A parameter file helps with part of this problem. You can provide the values for all your parameters in a single file rather than typing them in at the command line every time you want to execute a deployment.
While the parameter file helps, it can still be tedious and error prone to declare and pass all those parameters between modules. In the future, I plan to convert all the individual parameters to properties of an object. I will still save and get the values from a parameter file, but instead of passing all those individual parameters around, I’ll pass a single object and reference the values off that object.
Bicep provides a lot of functionality with parameters, including providing default values, constraints on values and much more. For more information, see: Parameters in Bicep.
Parameters and Parameter File:

- On the left are some of the parameters defined in ‘main.bicep’. On the right are those parameters with values defined in a parameter file.
- The parameter file is stored as ‘parameters.jsonc’
Execute Deployment via Azure CLI with Parameter File:

You can review the status of completed deployments or monitor in-progress deployments from the Azure portal. If the deployment is actively running, the status will be listed as Deploying. Completed deployments will have a status of Succeeded or Failed, depending on the results. If viewing in real time, the portal should automatically refresh, and you’ll see individual modules and resources within those modules as they are deployed.
Monitor the Deployment:
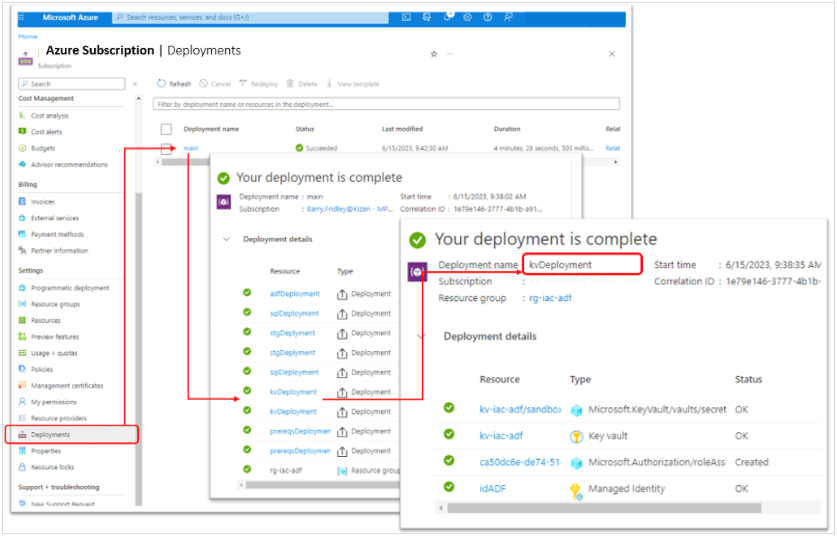
- Select the Azure subscription in which you ran the deployment.
- Select deployments from the left-hand menu. From here you will see all the deployments ARM has run in the selected subscription.
- The top-level deployment is named for bicep file used in in ‘az deployment’
- Select the deployment, ‘main’ (from ‘main.bicep’) in this case.
- Select Deployment Details to list each deployment within main.
- Within main, you see each module defined in ‘main.bicep’.
- Select ‘kvDeployment’ to view the key vault and other resources deployed.
Recall that the first resource created in my deployment was the resource group (‘rg-iac-adf’, in this case). All resources share the same life cycle and scope and I create all the objects in this resource group.
Review Deployed Objects:
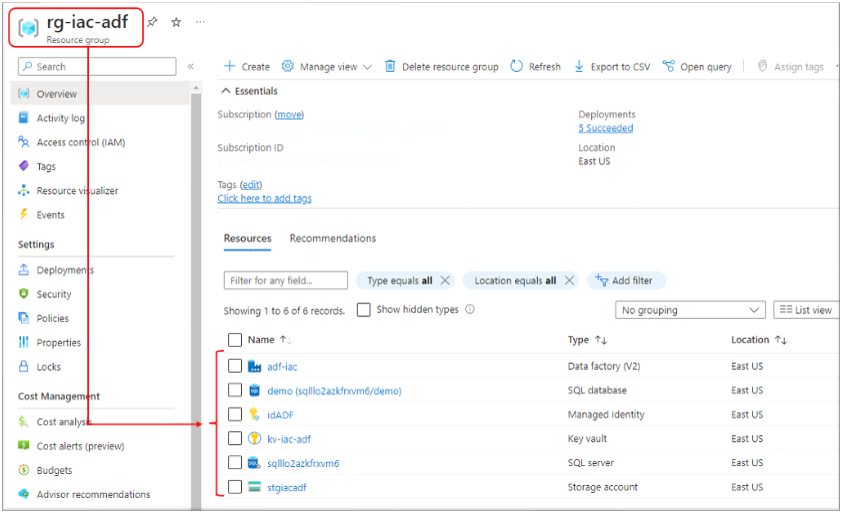
- From the Azure portal, select resource group ‘rg-iac-adf’
- From there you can see all the individual resources created during the deployment.
As part of the Data Factory deployment, I create a pipeline that copies data from a source CSV file and creates a SQL Server table with the data. As a demonstration of best practices, I use parameters on various artifacts to make them reusable for any CSV file and SQL table. Below I’ll review the set of resources created to handle the incoming CSV file. Similar resources, utilizing parameters and dynamic expressions, are created to handle the outgoing SQL tables. In the interest of space, I’ll review the CSV resources only.
Data Factory Linked Services:
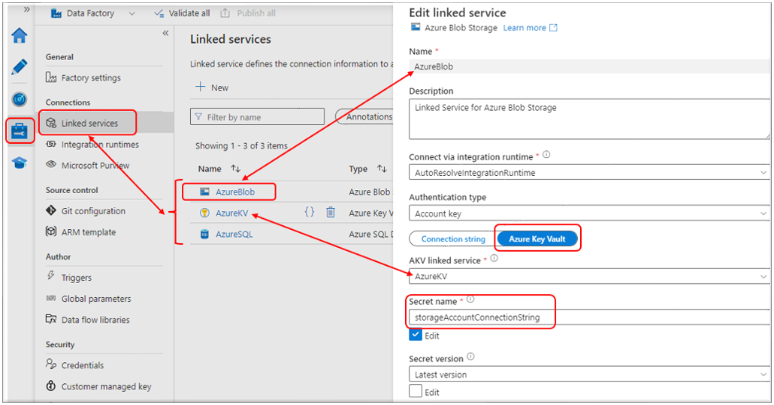
- From within Azure Data Factory Studio
- Select Manage, then Linked Services
- Three Linked Services have been created (‘AzureBlob’, ‘AzureKV’ and ‘AzureSQL’)
- ‘AzureBlob’ and ‘AzureSQL’ use the Key Vault Linked Service (‘AzureKV’) to access and manage the secrets created.
- In this case, the ‘AzureBlob’ linked service is using Azure Key Vault to retrieve the secret ‘storageAccountConnectionString’.
Data Factory Datasets with Parameters:
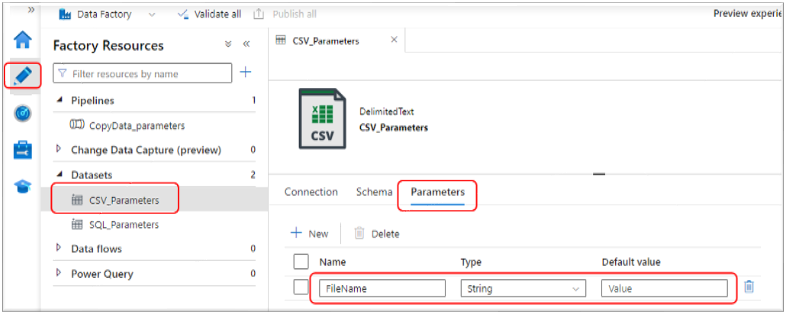
- Select Author, then Datasets
- Select the dataset ‘CSV_Parameters’
- Select Parameters
- From there you see the ‘FileName’ parameter that will receive the filename value from the Pipeline parameter and pass it to the file path property in the connection settings
CSV Dataset Parameter for File Path:
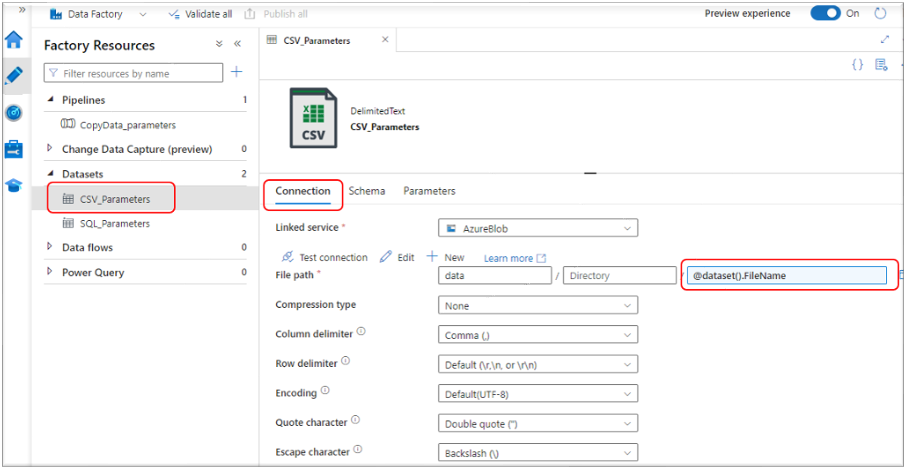
- Select Connection
- The dynamic expression: ‘@dataset().FileName’ is used to pull the file name from the dataset parameter ‘FileName’
- Below that you can see all the other text file definition properties set in the bicep file.
Data Factory Pipeline with Parameters:
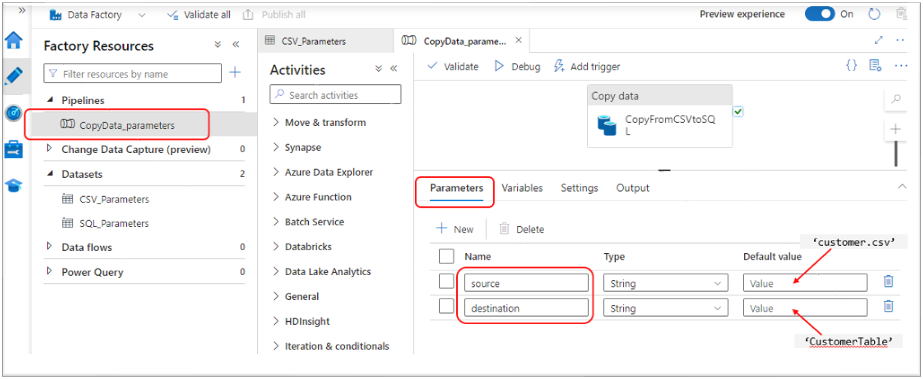
- Select Pipelines and then ‘CopyData_parameters’ pipeline
- Select Parameters
- From there you see the two string parameters declared in the Bicep (‘source’ and ‘destination’).
- These parameters will be set with the name of the source file to copy (‘customer.csv’) and the name of the destination SQL Server table name (‘CustomerTable’) to store the data after it passes through the pipeline.
Use Parameter in CopyData Activity:
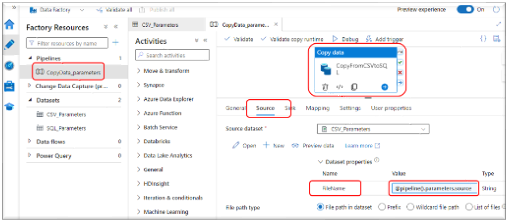
- Click on the Copy data activity then click Source.
- Once the pipeline parameters are set, the values are passed downstream to the parameters declared on the individual Datasets
- The Source FileName is set with the dynamic expression: ‘@pipeline().parameters.source’ to define the file to be used by the Source dataset.
There is a lot more to Bicep and it’s a much more powerful tool than I’d originally thought. And while I only touched on just the basics, this post still turned out to be longer than I originally anticipated. I also hope to have shown how you can use the concepts and tooling of IaC to not just deploy infrastructure, but to enforce standards and best practices while doing so.

As a Microsoft Gold Partner with 30 years experience helping organizations achieve their IT business goals, we offer unrivaled expertise and innovation in Microsoft technologies.