
In today's fast-paced business landscape, staying ahead of the competition requires efficient and effective solutions. According to Microsoft’s Work Trend Index, nearly 70% of employee report that they don’t have sufficient time in the day to focus on “work”, with more time being spent Communicating than Creating.
Microsoft 365 Copilot is designed, with Microsoft’s cloud trust platform at its core, to allow for employees to both be more productive, reduce the time spent searching for information, performing mundane tasks, and other low-value activities.
Azure Data Factory (ADF) is a Microsoft Azure service that greatly simplifies the process of designing Extract, Transfer, Load (ETL) pipelines for data integration. ADF provides a graphical interface for performing common, code-level tasks and includes a wide variety of options, which may be utilized to accommodate multiple approaches to designing complex ETL processes. Integrating data from an API is one of many ETL tasks that data factory can handle. In this article, a brief walkthrough is presented to demonstrate the use of data factory for moving data from an API to a database table.
Tools and Process
This walkthrough will use the Joke API. The Joke API is a simple, free API that can be used by developers for testing purposes. The website includes documentation and a URL generator for the API. In the walkthrough, joke data will be moved into a target table in an Azure SQL Database. The pipeline development process will be described in three sections: setup, build, and test.
Setup
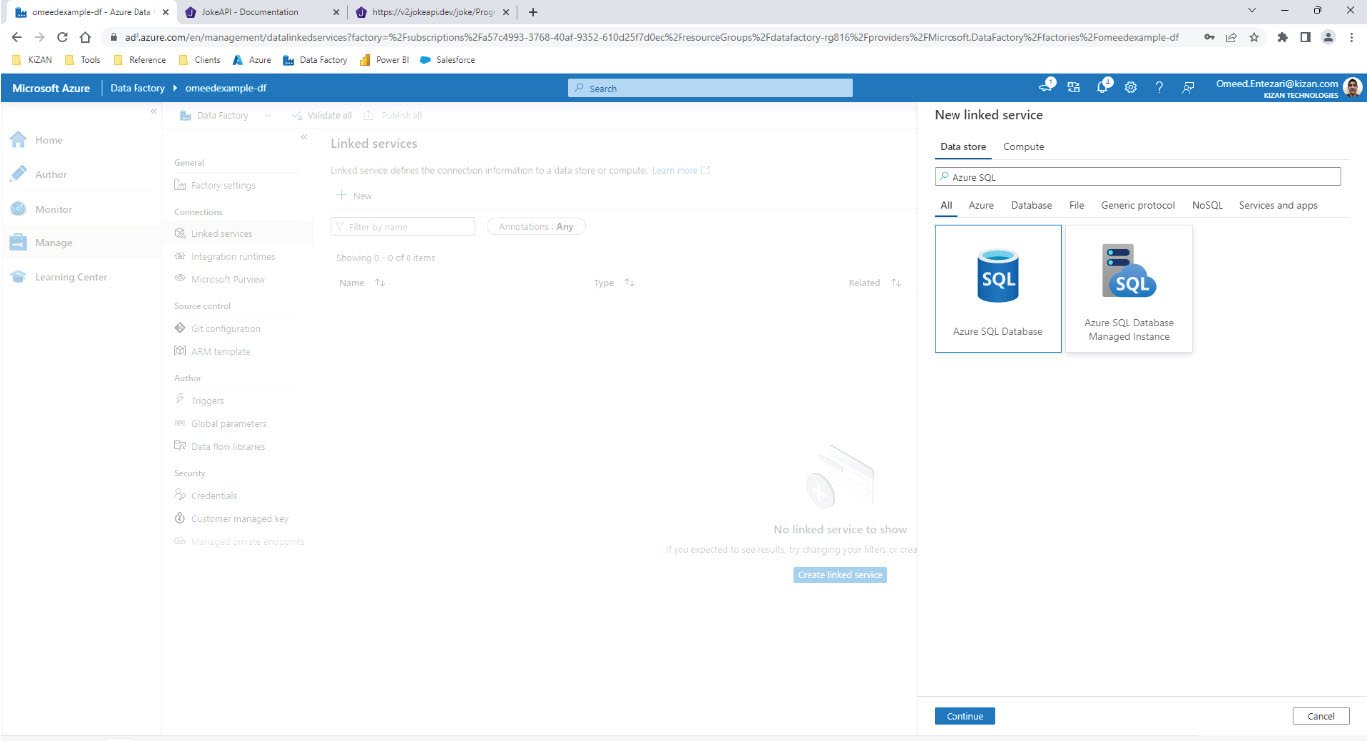
The first step is to add a Linked Service in Azure Data Factory to connect to the Azure SQL Database. This Azure SQL Database will be the target database that will hold the joke data. In ADF, create a new Linked Service for the Azure SQL Database.
After setting up the Linked Service in ADF, a target table should be created in the Azure SQL Database to store the joke data. To keep things simple, the table will be defined to hold just five pieces of information about each joke. The create table statement will include five columns.
create table jokes(
date_loaded date,
setup varchar(200),
delivery varchar(200),
id int,
lang char(2)
);
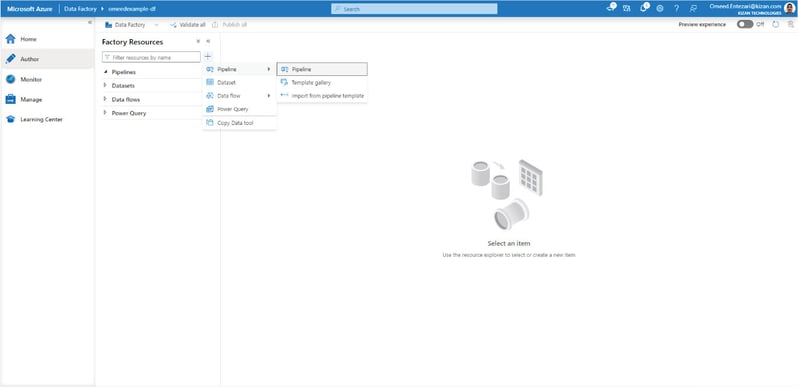
Next, an ADF pipeline will be created and renamed to “main.” This pipeline will be built to request joke data from the Joke API and load the returned joke data into the Azure SQL database.

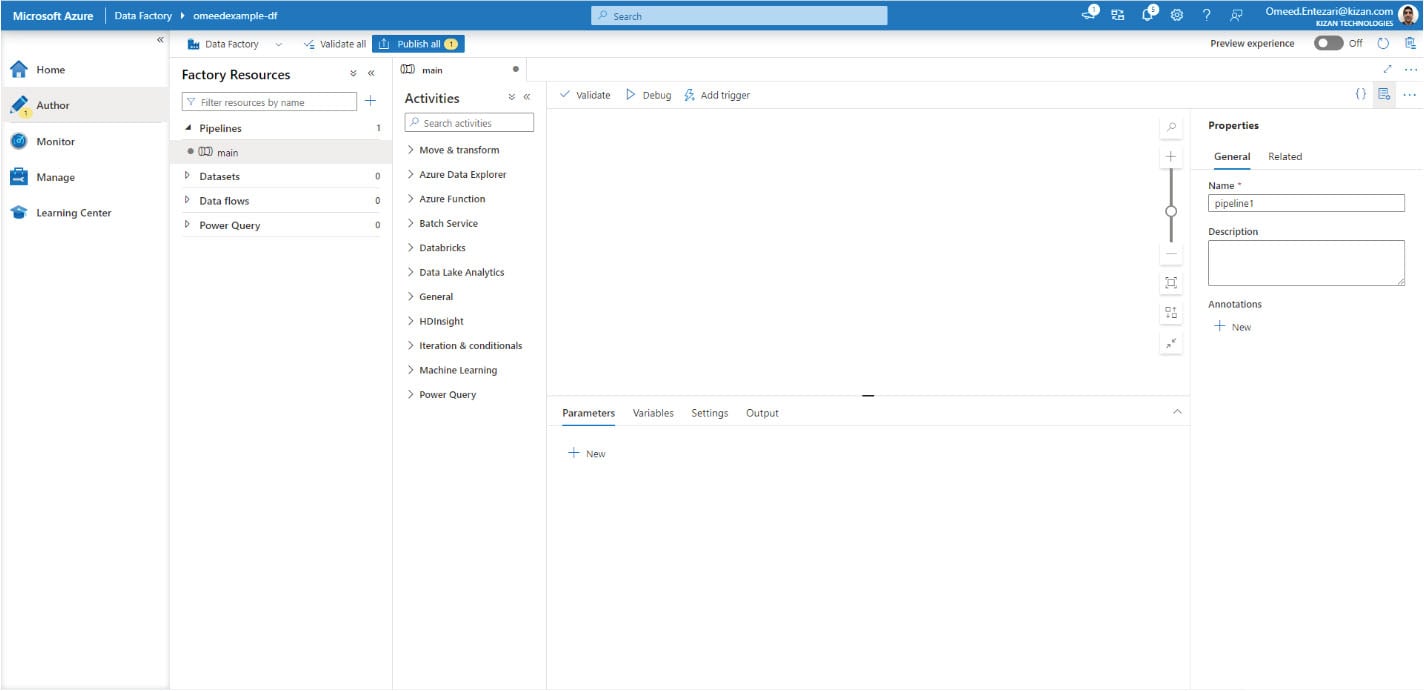
Build
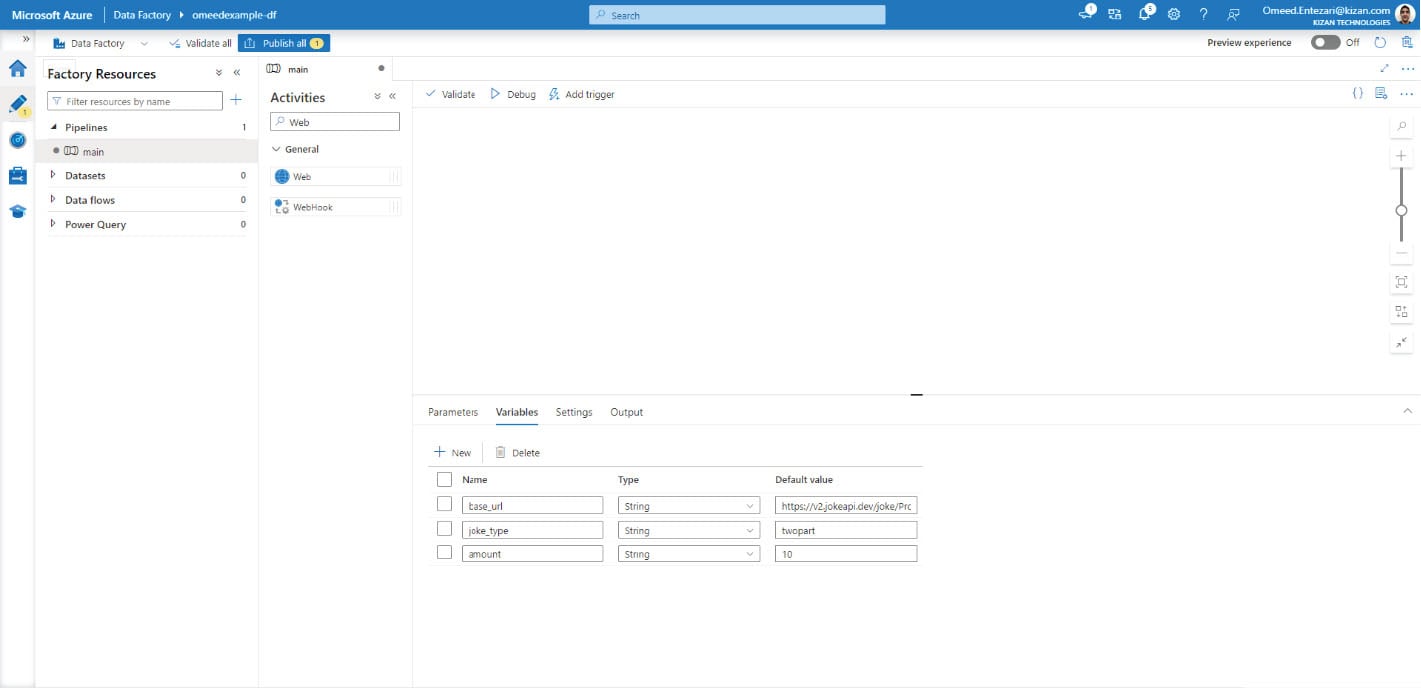
Now that an ADF pipeline has been created, variables will be added to it. These variables will be used to build out the URL for the API request. Add the following variables to the pipeline.
|
Name |
Value |
Type |
|
base url |
String |
https://v2.jokeapi.dev/joke/Programming |
|
joke_type |
String |
twopart |
|
amount |
String |
10 |
Next, a Web activity will be added to the pipeline canvas. This activity will make the initial request for data from the Joke API. In the pipeline, the activity will be renamed to "api_request." For the URL field of the api_request activity, a dynamic expression will be used to build out the URL using the variables defined in the previous section. In the Pipeline expression builder, the following code will be written:
@concat(
variables('base_url'),
'?type=',
variables('joke_type'),
'&amount=',
variables('amount'),
'&safe-mode'
)
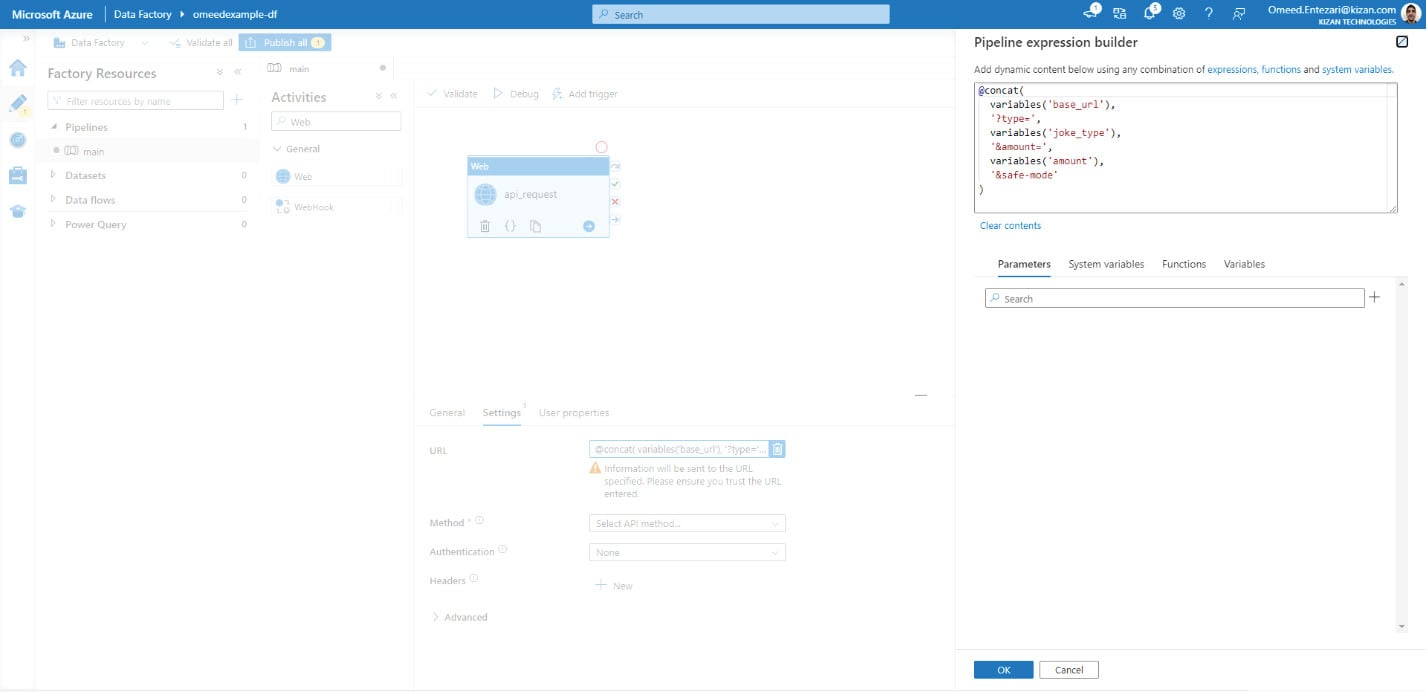
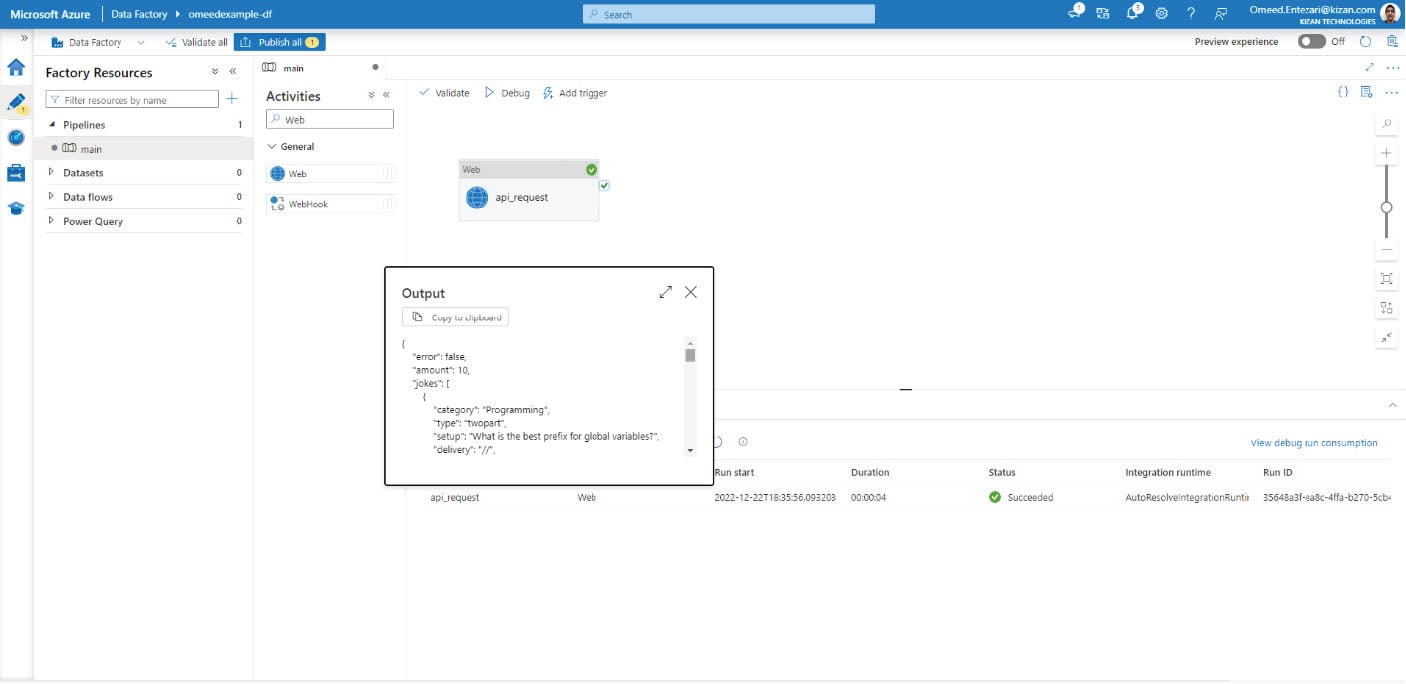
Next, the Method property of the Web activity must be set. "GET" will be selected for the Method of the Web activity. A good habit is to make small changes and test them before moving forward. Using the Debug feature, our pipeline can be executed to check that the Web activity we just created, api_request, will run as expected.
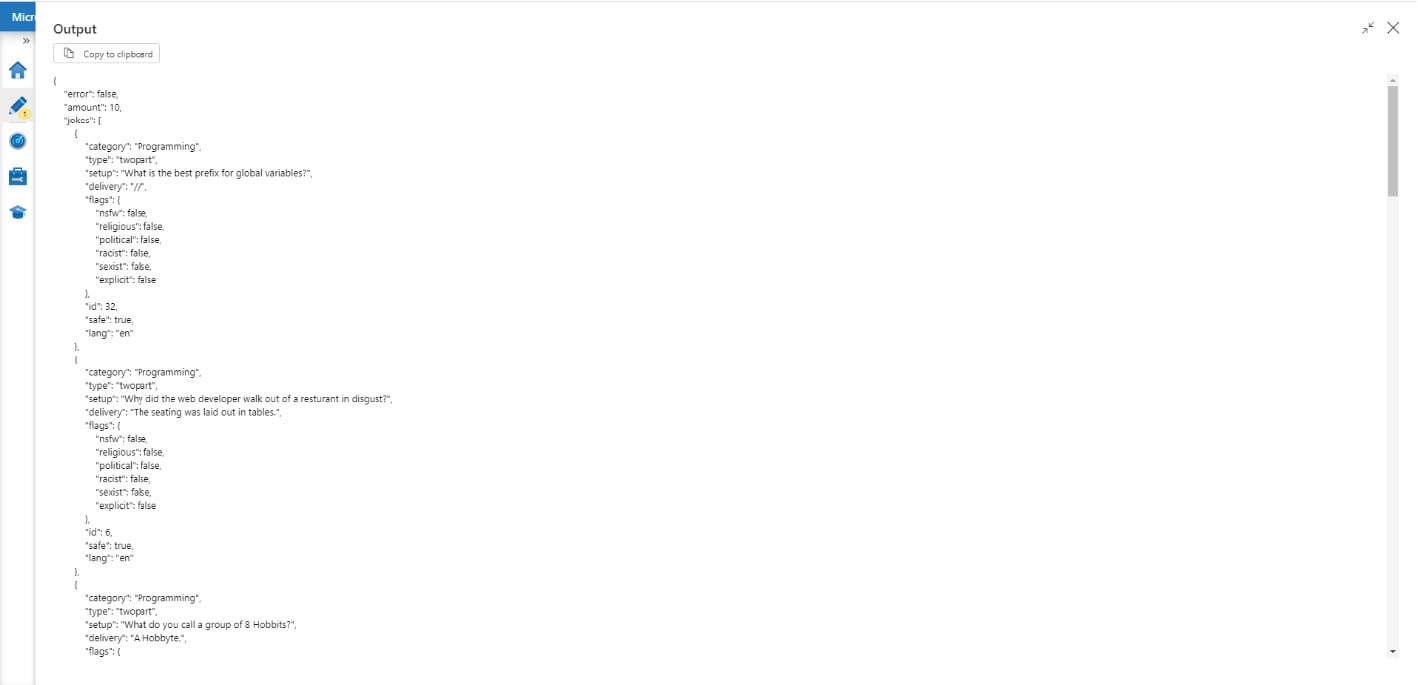
After running Debug, the Output tab of the pipeline will show a table of all activities that ran during the Debug session along with some additional information about each. Each activity will have input and output information available. After debugging, we can view the output of the api_request activity to verify that a JSON object was returned by the api_request activity. Viewing its output, we can confirm that the api_request activity is returning a jokes array, which includes ten joke objects.
Now that it’s been confirmed that joke items will be returned by the api_request activity, the next steps will be to loop over its outputted “jokes” array and, for each of the array’s objects, create a row in the jokes table of the Azure SQL Database. This can be done in ADF using a ForEach activity.
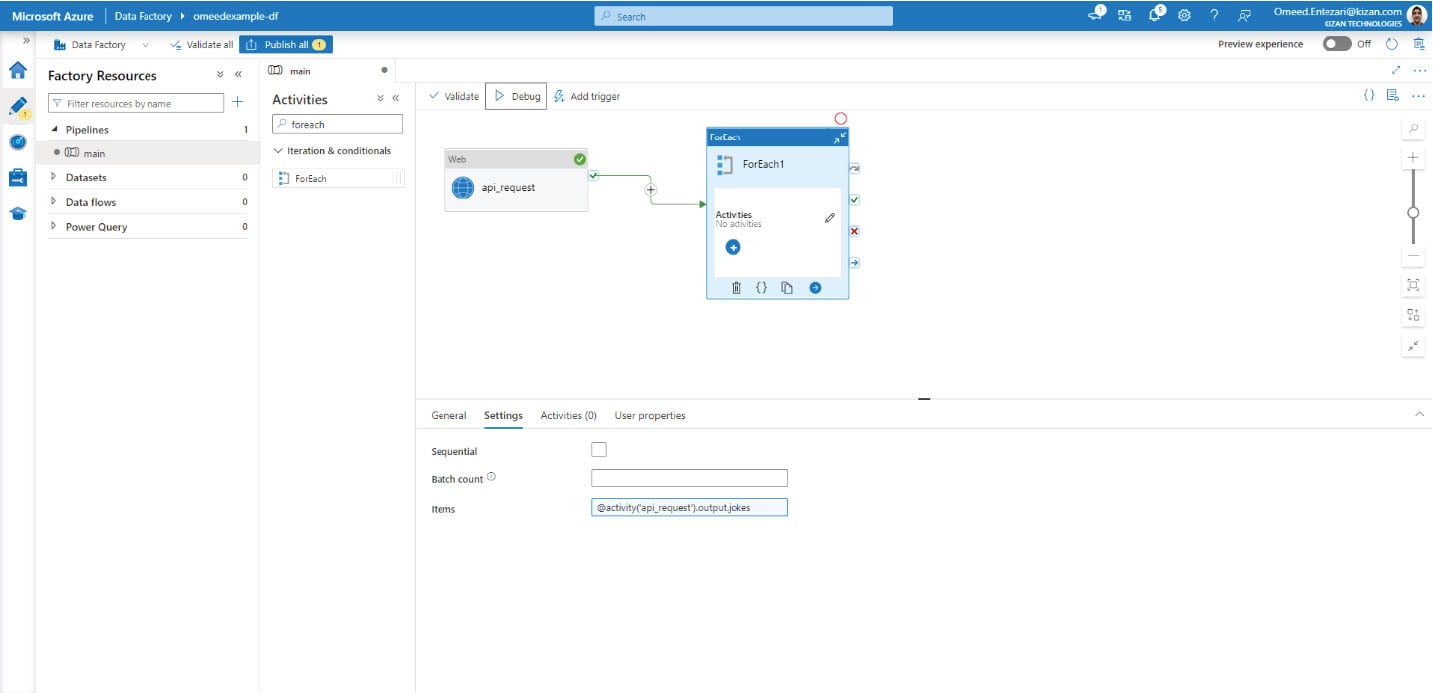
A ForEach activity will now be added to the pipeline canvas and set to run after the api_request activity has completed successfully. An important property of a ForEach activity is its Items property. This property indicates over what set of items the ForEach activity should loop. In this case, the Items property must refer to the jokes array returned by the api_request activity, so the following dynamic expression will be written in the Items field:
@activity('api_request').output.jokes
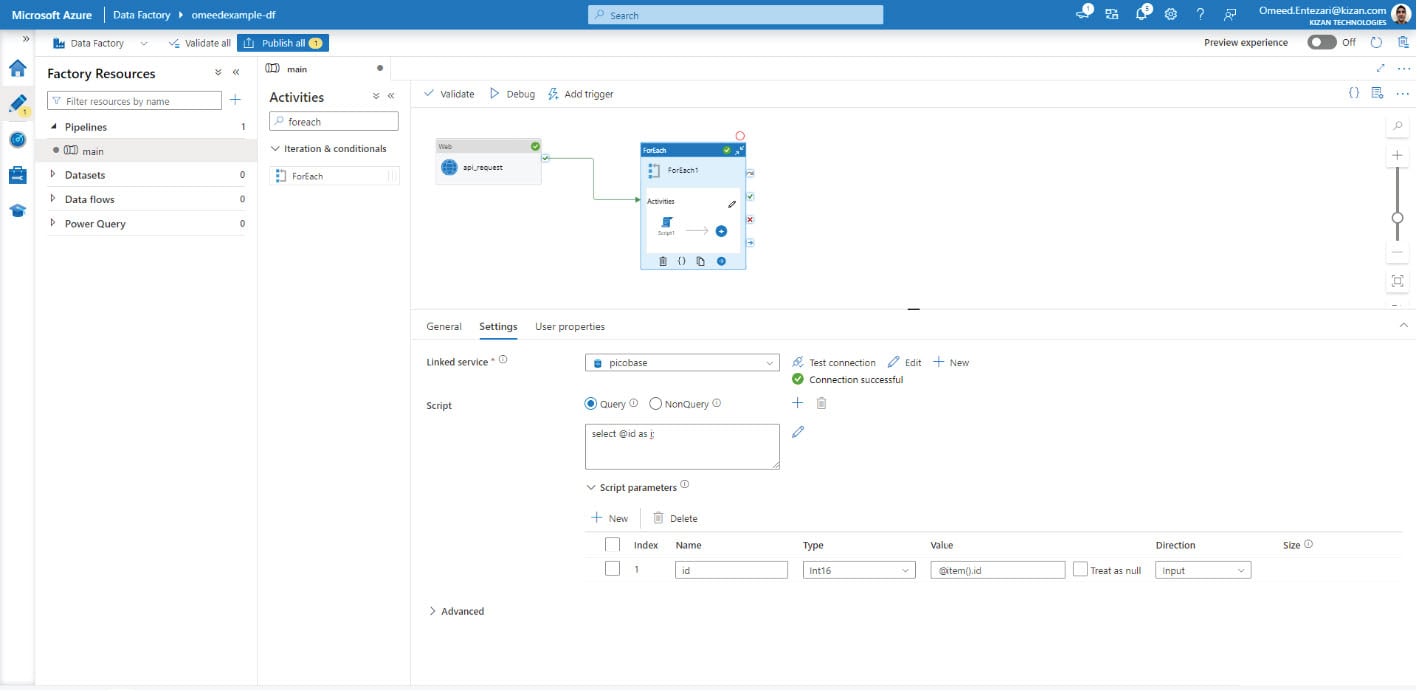
Now a sub-activity must be added to the ForEach activity – this will indicate what the ForEach activity will do for each item in the Items field. Recall that the Items field holds a reference to the entire JSON array returned by the api_request activity. Since we want to insert each of those joke objects into the Azure SQL Database, a Script activity in which we write a SQL INSERT statement will be sufficient. Initially, for debugging purposes, this Script will simply verify that the ForEach activity is able to collect information outputted by the api_request activity. After adding the Script1 sub-activity to the ForEach activity, the Linked Service for the Azure SQL Database will be selected. Then, the following script parameter will be added:
|
Name |
Type |
Value |
Direction |
|
id |
Int16 |
@item() .id |
Input |
In the Script field of the Script1 sub-activity, the following SQL statement will be added (Note: script type is set to Query, but will be changed later).
select @id as i;
This initial setup will help us determine if the ForEach activity can access at least one of the joke properties returned by the api_request activity. What we’re doing is assigning a parameter to the Script activity and telling it that the value of that parameter should come from the id property of each joke object scanned during the ForEach loop. Then, in the SQL script, as shown above, we’re writing a basic SELECT statement to utilize that parameter. This will prove that we can capture a property from every joke returned by the api_request activity.
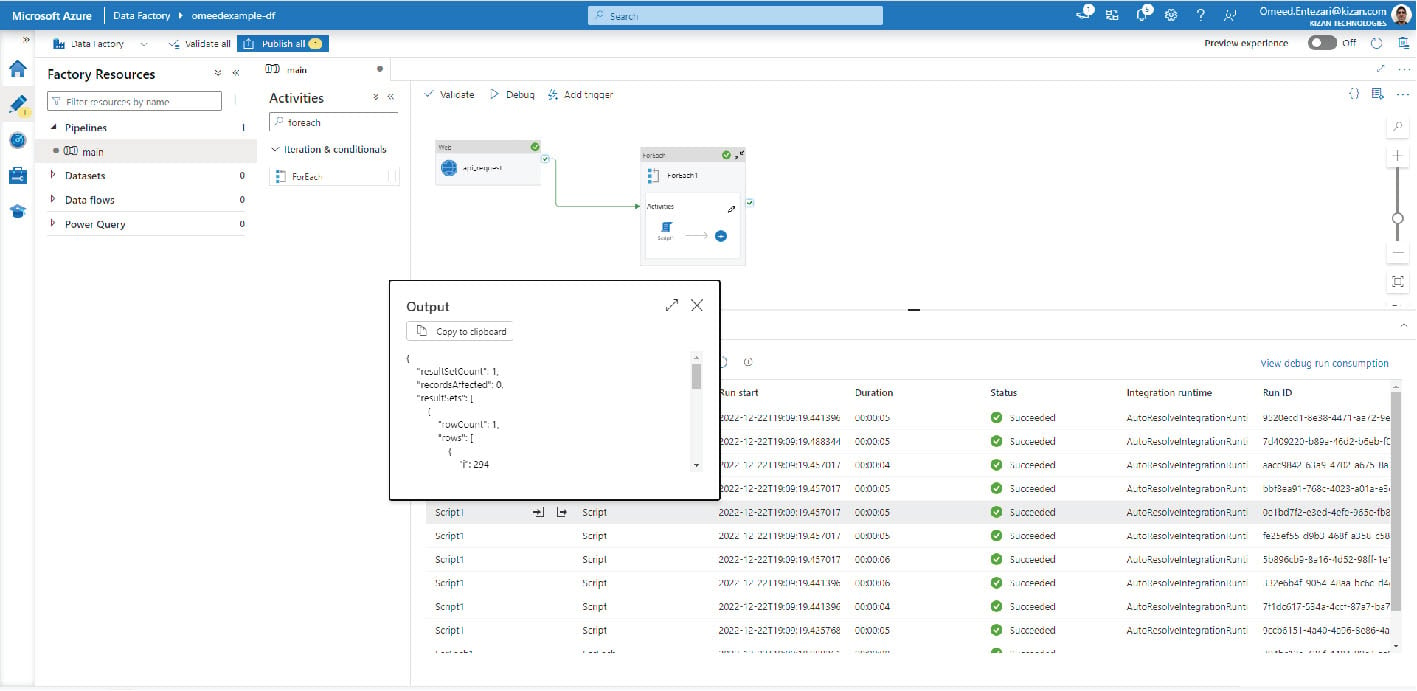
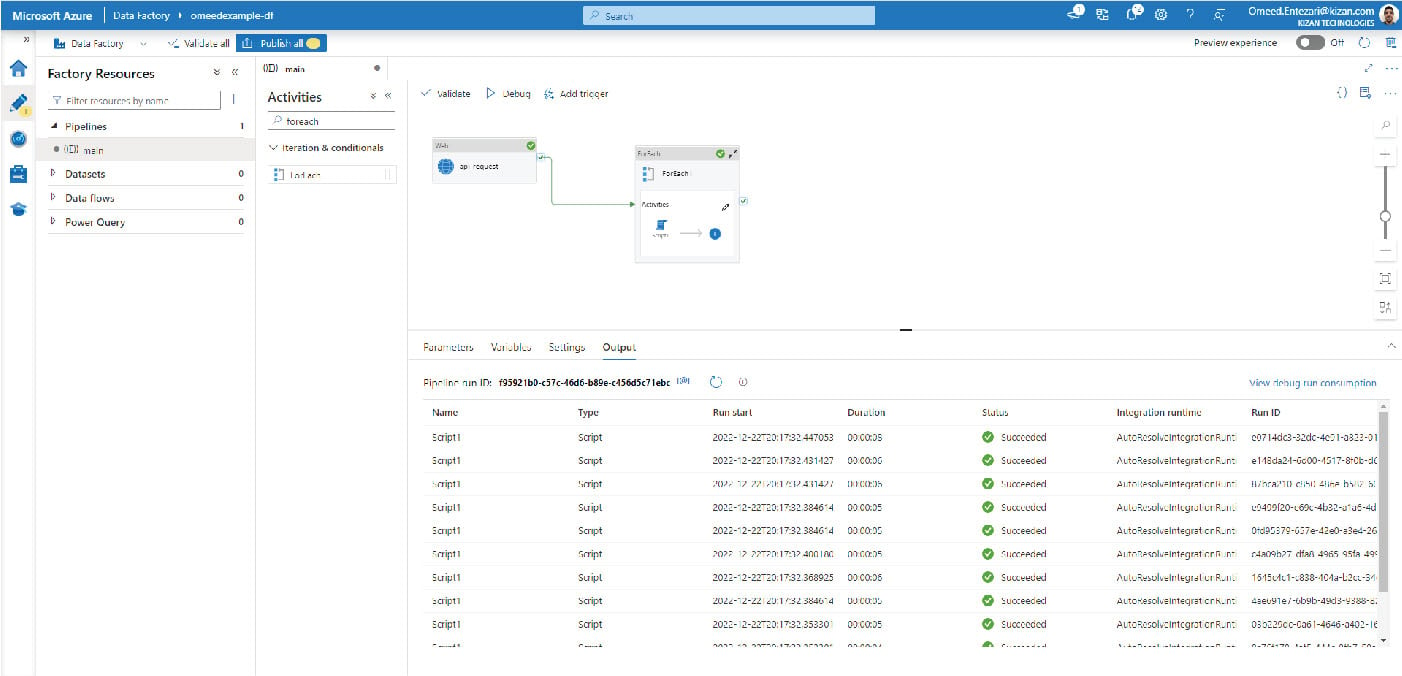
After executing Debug, it's confirmed that the Script is running successfully for each of the ten items returned by the activity, api_request. By viewing the output of each iteration of Script1, it is confirmed that the id value, shown as “i,” matches the ids shown in the output of the api_request activity.
Now, the script and parameters of the Script1 sub-activity can be updated for the purpose of performing a row insertion for each joke object returned by the api_request activity.
|
Name |
Type |
Value |
Direction |
|
id |
Int16 |
@item() .id |
Input |
|
setup |
String |
@item() .setup |
Input |
|
delivery |
String |
@item() .delivery |
Input |
|
lang |
String |
@item() .lang |
Input |
|
date loaded |
String |
@formatDateTime(utcnow(),'yyyy-MM-dd') |
Input |
Updated script (Note: script type will now be changed to NonQuery):
insert into jokes(date_loaded, setup, delivery, id, lang) values(
@date_loaded,
@setup,
@delivery,
@id,
@lang
);
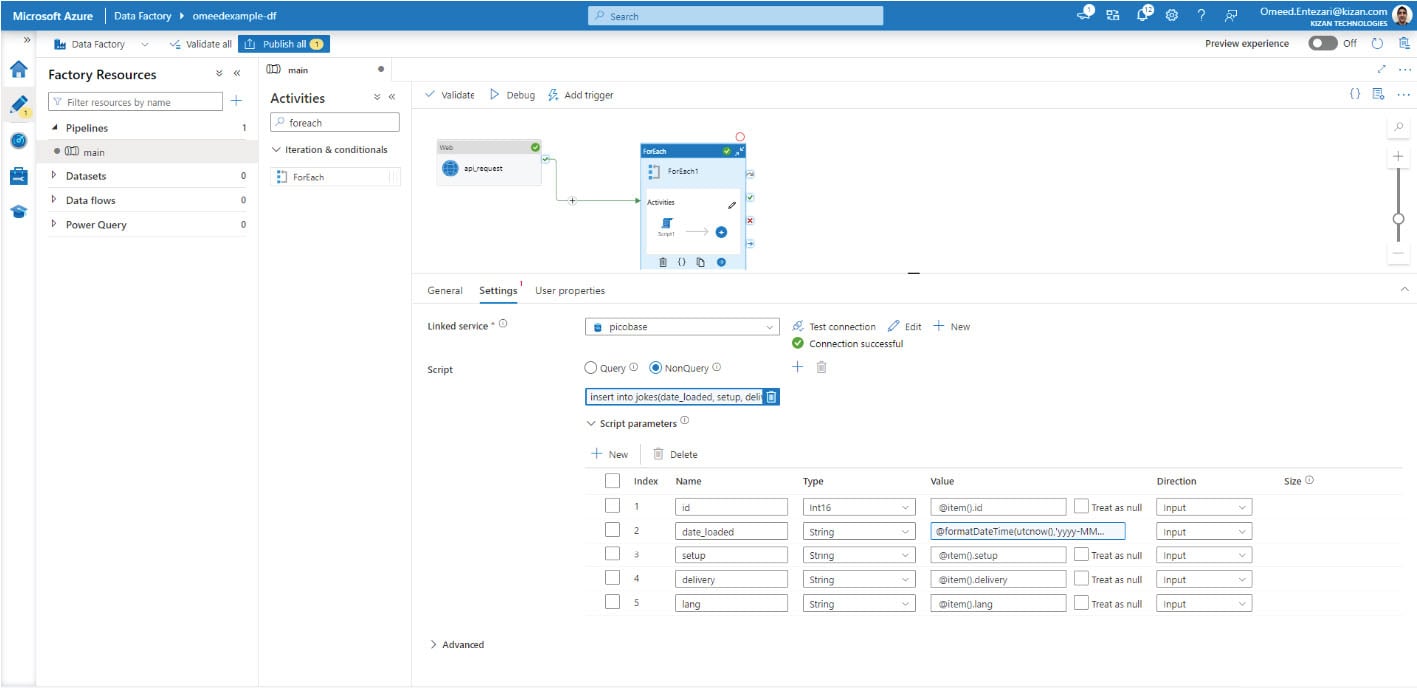
In the Script1 sub-activity, the values defined in the Script Parameters section are passed to the SQL script by using an @ symbol followed by the parameter name - for example, the date_loaded parameter becomes @date_loaded in the Script field (note that this is a special syntax used by SQL Server – other databases may require a different operator/syntax). Each parameter uses a dynamic expression to grab a value from each joke item iterated upon by the ForEach activity. Only the value of the date_loaded column is generated entirely by an ADF dynamic expression without making a reference to the jokes array iterated upon by the ForEach activity.
Test
When debugging, no result sets will be returned to the pipeline output window by the iterations of the Script1 sub-activity. Instead, the data will be inserted directly into the Azure SQL Database table, jokes. After debugging and verifying that the Script1 sub-activities were successful, a quick SELECT statement can be executed on the jokes table in the Azure SQL Database to check that the ADF pipeline successfully inserted a row into the jokes table for each of the objects returned by the Joke API.
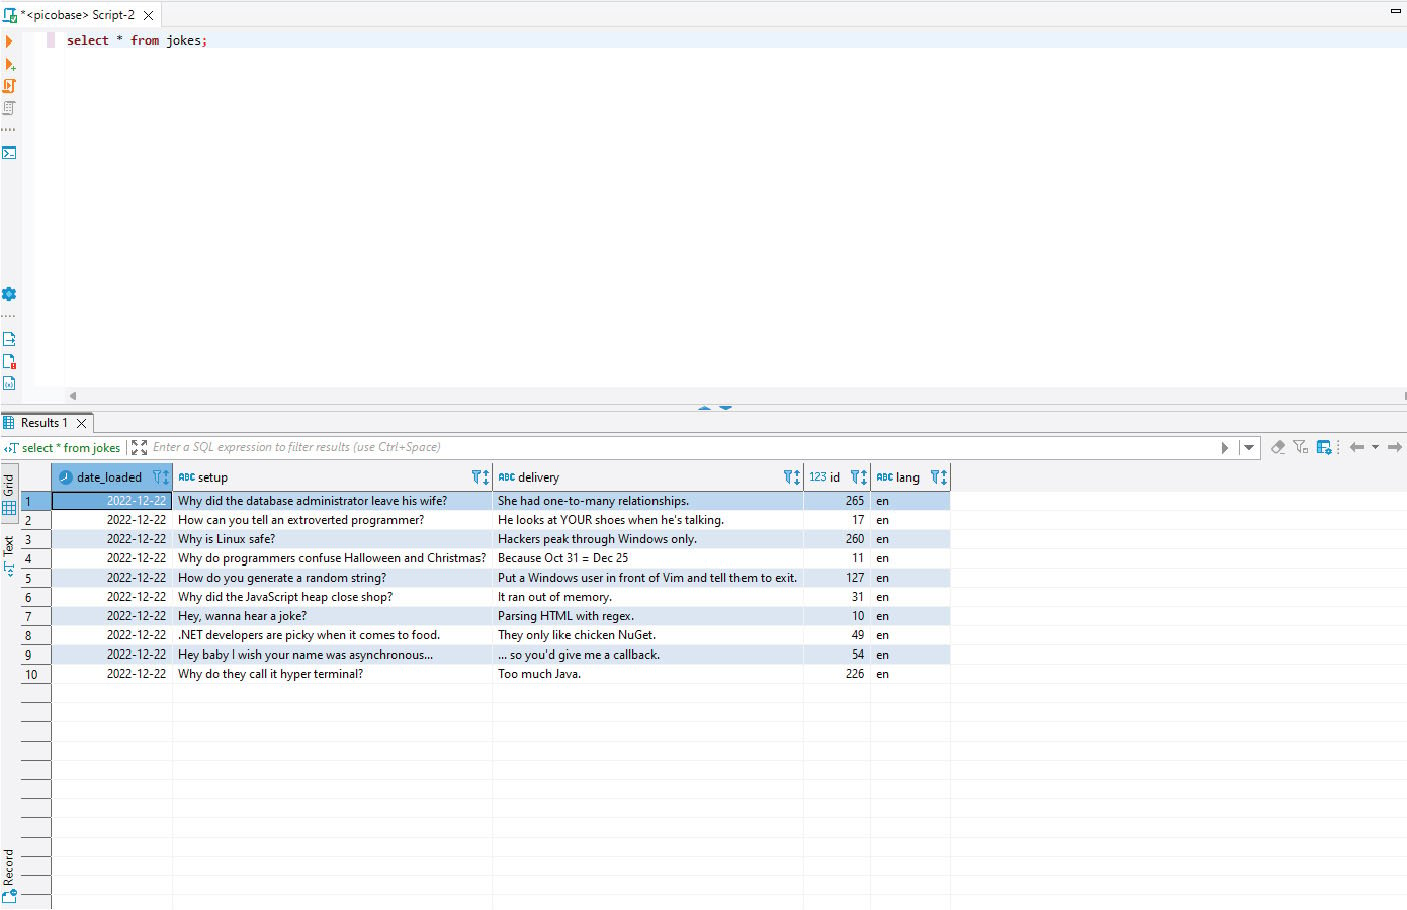
Following confirmation that the pipeline has worked, every time it’s executed, whether manually or with a scheduled trigger, the ADF pipeline will use the Joke API to load data into the jokes table in the Azure SQL Database.
SQL Database Migration to Azure Workshop
Migrate your first database workloads to Azure with KiZAN’s proven practices.

KiZAN is a Microsoft National Solutions Provider with numerous gold and silver Microsoft competencies, including gold data analytics. Our primary offices are located in Louisville, KY, and Cincinnati, OH, with additional sales offices located in Tennessee, Indiana, Michigan, Pennsylvania, Florida, North Carolina, South Carolina, Georgia and Texas.