

In today's fast-paced business landscape, staying ahead of the competition requires efficient and effective solutions. According to Microsoft’s Work Trend Index, nearly 70% of employee report that they don’t have sufficient time in the day to focus on “work”, with more time being spent Communicating than Creating.
Microsoft 365 Copilot is designed, with Microsoft’s cloud trust platform at its core, to allow for employees to both be more productive, reduce the time spent searching for information, performing mundane tasks, and other low-value activities.
This post is the seventh in a series describing our automation efforts for provisioning Windows 10 IoT Core on a Raspberry Pi. To recap, KiZAN has a lab of 26 Raspberry Pi 2 boards running Windows 10 IoT Core. On a regular basis, we need to re-flash, provision and configure the boards. When we perform the re-flash and provisioning process, it is manual and consumes more time than we want to spend (up to 2 days). In this post, you'll learn how to disable SoftAP in Windows 10 IoT Core with PowerShell. 
Posts in this series:
Posts in this series:
- How to Find the IP Address of a Windows 10 IoT Core Device After Initial Flash with PowerShell
- Renaming a Windows 10 IoT Core Device via PowerShell
- Installing WiFi drivers in Windows 10 IoT Core with PowerShell
- Disabling Windows Update in Windows 10 IoT Core with PowerShell
- Setting the Screen Resolution in Windows 10 IoT Core with PowerShell
- Setting the Time Zone in Windows 10 IoT Core with PowerShell
- Disabling the Soft AP on Windows 10 IoT Core Using PowerShell (this post)
What is SoftAP?
SoftAP stands for Software-enabled Access Point and is software that turns a computer into a WiFi access point. By default, SoftAP is enabled in Windows 10 IoT Core. Putting this into the context of our Raspberry Pi 2 IoT lab, when we re-flash our devices, we end up with 26 additional WiFi access points. It's pretty cool that the devices can become access points, but there's no reason to have this turned on by default in our lab.
Problems
If you've been following along in this series, you've seen a pattern: write a short PowerShell script, execute it remotely, reboot a device. We're departing from that process starting now. Unfortunately, there is not a publically-defined API for disabling SoftAP, so I had to figure this out on my own…through a lot of trial and error.
Discovering the Windows 10 Device Management API
After realizing that the Windows 10 IoT Core device portal was a simple website that made REST calls to a self-hosted REST API, I decided to do some good old detective work with my best friend: Chrome developer tools and Wireshark. After starting both, I opened the Windows 10 IoT Core device portal and manually disabled SoftAP. Before I disabled SoftAP, I opened the Developer Tools on the web page and clicked the network tab to see what activity is present when I click save. In the developer tools window, I saw the REST API call to /api/iot/iotonboarding/softapsettings. Interesting.
After digging around further, I discovered that there is quite a bit of undocumented REST API functionality in Windows 10 IoT Core. First, there is a web page named RESTDocumentation.htm in the root of the device portal. There are no links to it, and depending upon the version of Windows 10 IoT Core you're running, the document may or may not exist (and even when it does exist, the contents of it are highly unreliable).
After almost giving up, we decided to investigate the file system of Windows 10 IoT Core. After all, if the device portal was being hosted on the device, the files must be somewhere. We started our journey by using PowerShell to remotely access Windows 10 IoT Core to search for the admin portal source files. After a little hunting, we found C:/Windows/WebManagement/www/default. Jackpot! This is the directory containing RestDocumentation.htm. Unfortunately, by looking at the file, we confirmed it was actually blank, with very few HTML tags or script tags. But, we started looking closer at the script tags and found the page wasn't designed to have a lot of HTML - it was being dynamically generated, and it relied upon a file named RestDocumentation.json, located in the js directory of the web root. This discovery was the big break.
The RestDocumentation.json file contained detailed information on what the Windows 10 IoT Core REST API expected.
As we reviewed this code, something stood out: the REST functions on /api/iot are not listed in the REST documentation (which is where our IoT onboarding API routes exist). Perhaps the documentation was just not up-to-date, or it's not meant to be publically exposed. Regardless, we were back to Chrome developer tools and WireShark to sniff out the format of the REST API calls.
Making a REST Call to Windows 10 IoT Core with PowerShell
PowerShell has a cmdlet Invoke-WebRequest that makes a web request (POST, GET, DELETE, etc.) to a specified URI with corresponding credentials. I call out "with credentials" because, upon inspection of the Windows 10 IoT Core REST API calls, we discovered that it used Basic Authentication.
If you're not familiar with Basic Authentication, it passes a base-64 encoded string of a username and password in the HTTP request's header. Basic authentication (as it turns out) is pretty basic, and it's easy to create a PowerShell function that sends an authenticated web request.
I created a function called Invoke-AuthenticatedWebRequest that takes similar parameters to Invoke-WebRequest. In this function, I take the username and password given and created Basic Authentication to use in the Headers. Once the Basic Authentication is set up, I use Invoke-WebRequest to actually call the web request with the new header credentials, method, and content type. The function Invoke-AuthenticatedWebRequest is:
Something you'll notice is that the actual call to Invoke-WebRequest disabled HTTP Keep Alive. In our testing, we found that HTTP Keep Alive isn't well-supported on Windows 10 IoT Core. I'm not 100% sure why, but when we enable keep alive, we would receive periodic HTTP request failures.
Another thing to note is when we started using the Disable SoftAP script; I noticed it would fail now and then due to a "Bad Request." Again, it's unknown why this was happening, but we suspect that the REST API wasn't able to communicate with the underlying hardware or Windows APIs to disable the SoftAP service. To get around this, we wrote a retry process.
In the retry process, I had to create a try-catch that tested to see if the URI did not return an error. If an error was encountered, we'd wait a period of time, and retry the request. The request was retried up to 10 times.
You'll also notice that the first request that we retried was an HTTP GET. We used an HTTP GET request to ensure the SoftAP service was responsive, once this returned 200 OK, we issued the HTTP POST request to disable the AP.
In the script below, you'll see this process. To actually call the REST API and disable SoftAP, the script sends a request to /api/iot/iotonboarding/softapsettings?SoftAPEnabled=$softApEnabled&SoftApSsid=$sotApSsid&SoftApPassword=$softApPassword" where $softApEnabled, $softApSsid, and $softApPassword are base 64 encoded values that correspond to the values for the device. The try-catch and disable request code is:
This code has many output strings to show the user what is happening. A successful and complete output of the code looks like:
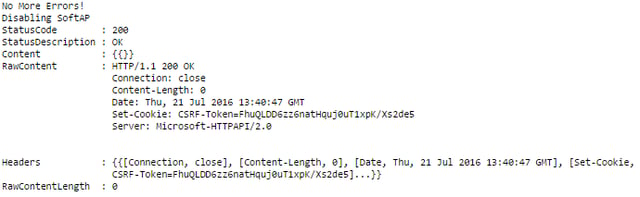
If there are errors, it will output that there was an error and show the retry count it is on.
The entire code listing to Disable the SoftAP on Windows 10 IoT Core using PowerShell is given below. In this code is the use of a Reboot-Device.ps1 file. This will be discussed in a later post.
In the next post, you'll learn how to enable the IoT remote server using a similar method.
Check out our free, hands-on, IoT development workshop series!